How To: Add & Activate an eSIM Line on Your iPhone XS, XS Max, or XR
All of the new iPhones from 2018 were released with dual-SIM support, but none of them were capable of actually using the eSIM in iOS 12, only the physical nano-SIM. But on iOS 12.1 and later, you can finally take advantage of eSIM so you can have, say, a business and personal plan on your iPhone XS, XS Max, or XR at the same time.
Requirements for Activating Secondary LinesSetting it up can be pretty confusing since digital eSIM is a completely new thing for iPhones. First, obviously, you need to have either an iPhone XS, XS Max, or XR with dual-SIM compatibility. Next, you need to have iOS 12.1 or later installed, which includes support for eSIM in the aforementioned devices.You'll also need to have an unlocked iPhone XS, XS Max, or XR in order to use plans from two different carriers simultaneously, otherwise, you'll need to use the same carrier — the one you already have a plan with.In the US, only AT&T and Verizon Wireless currently support eSIM use in your iPhone, T-Mobile will be adding support very soon. Sprint has also indicated they will support eSIM but gave no time table. However, if you just need some wireless internet when traveling out of the country, GigSky and Truphone support eSIM for data-only.Don't Miss: Which Wireless Carriers Support eSIM? The Always-Up-to-Date List for iPhone XS, XS Max & XR Another very important thing to mention is that if you use Sprint or Verizon Wireless, a CDMA provider, as your first activated line, your second SIM will not support another CDMA account, according to Apple. That means you'll need to use a GSM-based plan as a secondary as long as your iPhone is unlocked. If you bought your iPhone from Apple or Verizon directly, it will be unlocked, and it's the same for Sprint in most cases.
Multiple eSIM Plans Are SupportedWhile you can only use two cellular plans at the same time on your newer iPhone model, when making or receiving calls, you can only use one at a time. If you get another call from the opposite plan, it won't try and break through but will instead go straight to voicemail. So keep that in mind.Also keep in mind that you can have more than one plan on the eSIM, but that only one can be in focus at a time, meaning the other plans will not be usable at all until you manually switch between your current eSIM plan to another eSIM plan on your device.Don't Miss: 4 Reasons You Should Use eSIM on Your New iPhone
Step 1: Activate Another Line on the eSIMYou likely already have your primary cellular plan on your iPhone XS, XS Max, or XR on your nano-SIM, so in order to add a secondary plan like a work account, a local data plan in another country when traveling, or a separate data plan just because, to name a few examples, you'll need to scan a QR code from your carrier, use your carrier's app, or enter the information in manually.Before going any further, however, we suggest you contact your carrier to transfer your current nano-SIM account to the eSIM so it's easier to pop in a nano-SIM when traveling. However, if that doesn't matter to you or your carrier will not do it, you can simply activate a second or third line on the eSIM itself, like from a data-only provider like GigSky, which is geared toward travelers.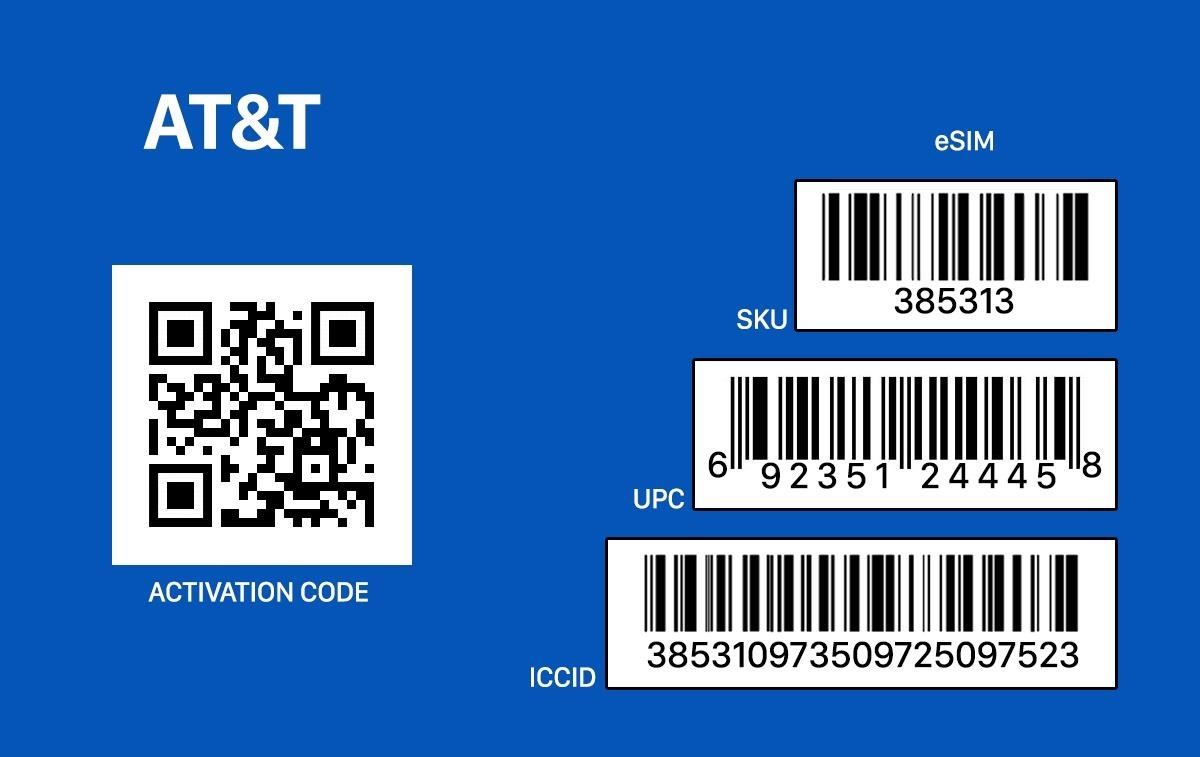
Option 1: Scan a QR Code from Your CarrierIf you get a secondary plan from either your current carrier or another carrier (if you have an unlocked iPhone), they should provide you with a QR code either in person on a receipt or via an email that you can scan to easily set up the plan. An example of what an AT&T eSIM activation card may look like. Once you have the QR code, open up the Settings app, tap "Cellular," then "Add Cellular Plan." Next, scan the QR code, and that's it. You may be asked to enter a confirmation code, which your provider would have given you, so use that to complete the process if you need to.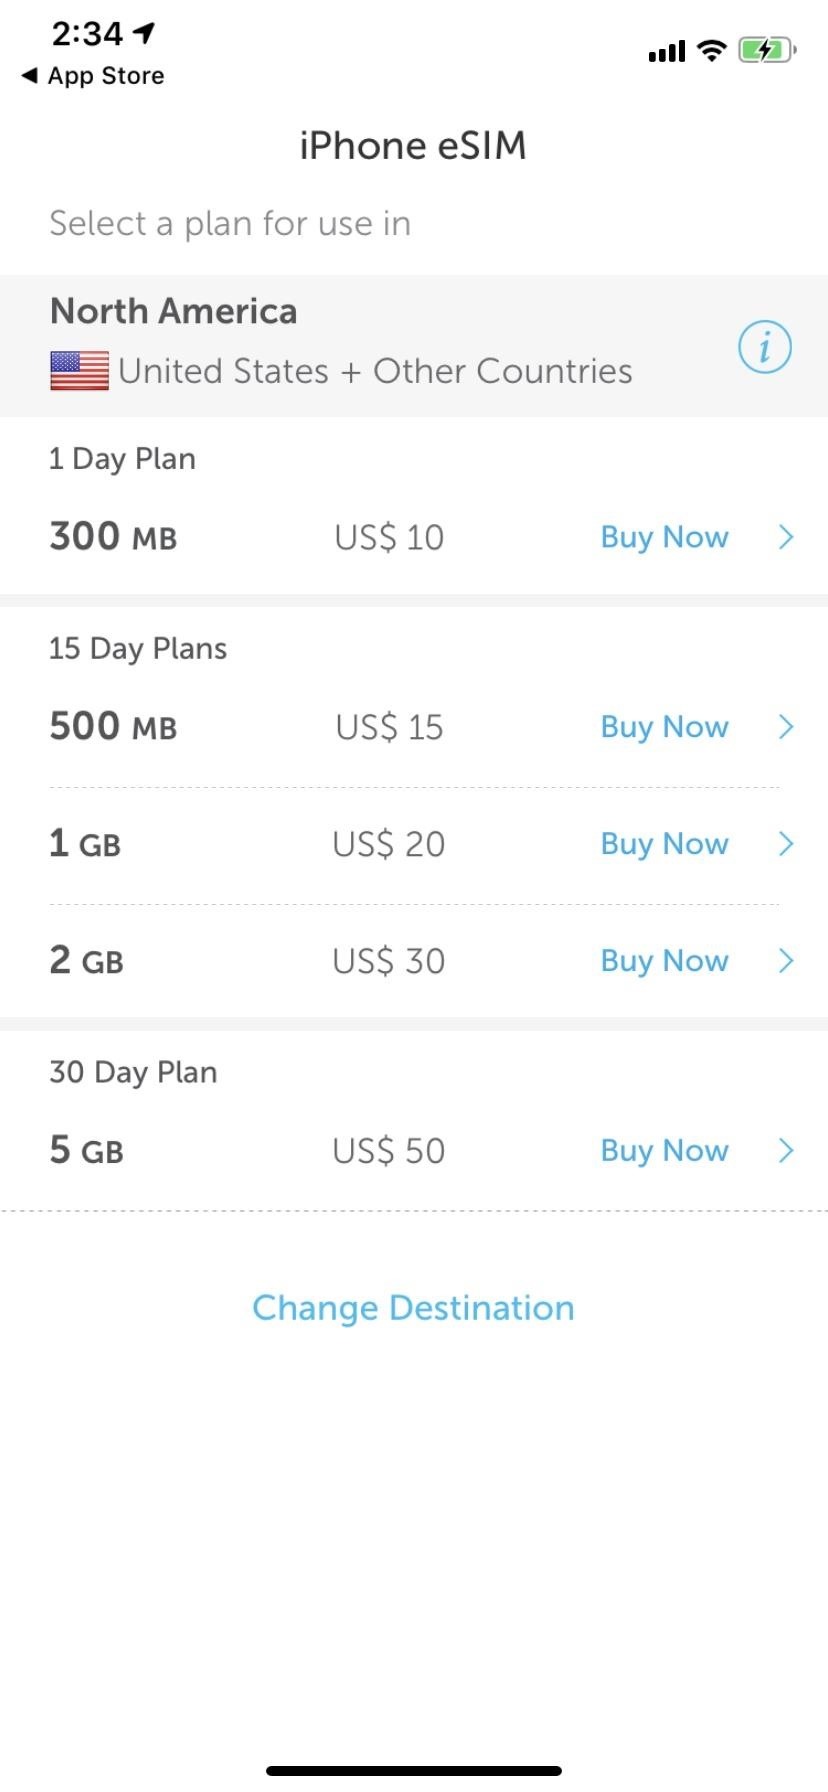
Option 2: Use Your Carrier's App to Get a PlanIn some cases, you can buy a secondary plan right from your carrier's app on your iPhone. For the big US carriers, that's only My Verizon right now. While AT&T supports eSIMs, you cannot yet add a plan from its myAT&T app. The T-Mobile app will let you set up prepaid plans very soon, while there is no info yet on whether the My Sprint Mobile will eventually work.However, other carriers like GigSky and Truphone, which offer prepaid plans for traveling, will also work. Each app will be different, so you'll need to figure out how to buy a secondary plan with it. During the process, you'll be able to set it up right on your eSIM.You won't be able to use the Sprint or Verizon app to purchase a secondary line if you are already on a CDMA network with your current plan. If you use AT&T or T-Mobile as your first activated line, you will be able to set a CDMA-based version up as a second plan using the Sprint or Verizon app, or you can set up another GSM-based line with the AT&T or T-Mobile app.Don't Miss: GigSky Supports eSIM for Easy Cellular Data When Traveling Going through the process via GigSky's app.
Option 3: Manually Enter the InformationIn cases where the above two options aren't available, you can still manually enter the information for your secondary line. Open up the Settings app, tap "Cellular," then "Add Cellular Plan." At the bottom of the Scan QR Code screen, tap "Enter Details Manually."You'll need to have the SM-DP+ address from your carrier, which is the Subscription Manager Data Preparation entity used to encrypt operator credentials during an over-the-air SIM activation. Also, you'll need an activation and confirmation code.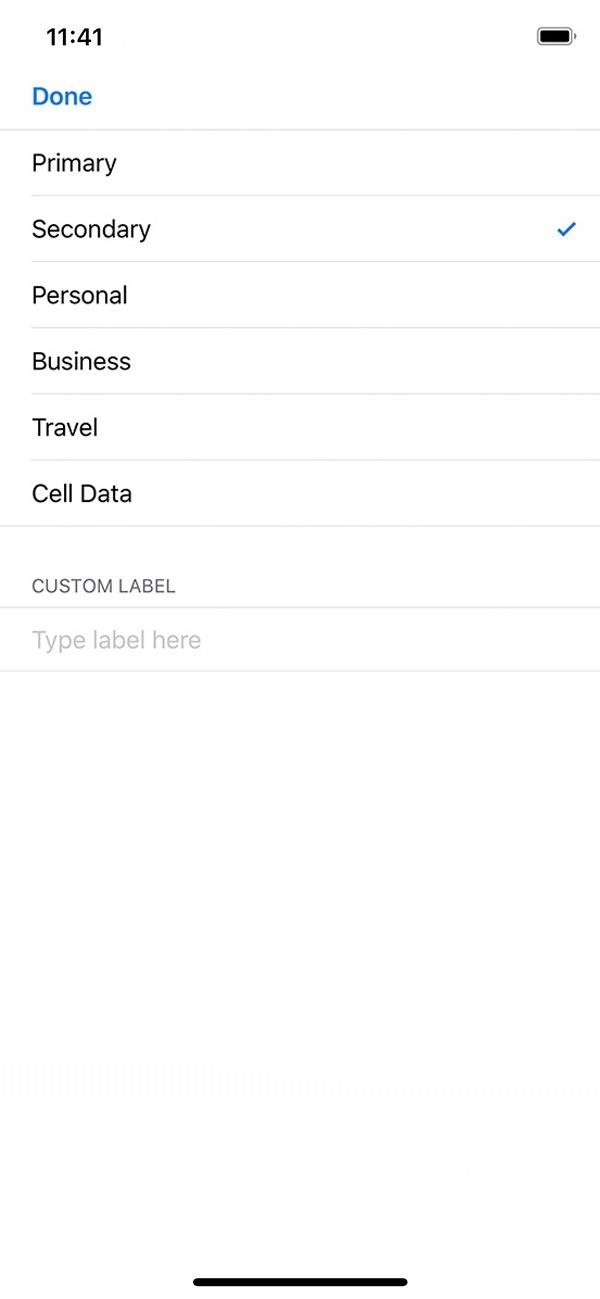
Step 2: Label Your New eSIM PlanAfter the plan has been activated, you'll need to label it so you can easily tell what plan you're using on your iPhone, your primary one or the one you just added. You'll be able to choose between "Primary," "Secondary," "Personal," "Business," "Travel," or "Cell Data," but you can also type out your own custom label.Afterward, hit "Done" to complete the setup. You can always change this later in "Cellular Plan Label" in the plan's cellular settings.
Step 3: Choose How It Works with Your Other PlanOnce you've labeled your new line, you'll now need to choose how your two plans work together on your iPhone (see second screenshot above). On the Default Line screen, you can choose either of the following options.Use "[First Plan Name]" as your default line. "[Second Plan Name]" will be available for phone and SMS. (This means your first plan will be your primary, so it will be the default for voice, SMS, data, iMessage, and FaceTime calls. The second plan will just be for voice and SMS.) Use "[Second Plan Name]" as your default line. "[First Plan Name]" will be available for phone and SMS. (This means your second plan will be your primary, so it will be the default for voice, SMS, data, iMessage, and FaceTime calls. The first plan will just be for voice and SMS.) Use "[Second Plan Name]" for cellular data only. "[First Plan Name]" will be your default line. (This means your second plan will only be used for data, which is a good option when you're traveling, and your first plan will be the default for voice, SMS, data, iMessage, and FaceTime calls.) Now that your iPhone is set up with two different plans you can use at the same time, you can start using them. In the Contacts app, you can assign your SIM account to contacts so it always defaults to using that account for each person. When making calls, you can change which line is used for iMessages and texts by default or you can switch when composing a new message. And that's just the start.Don't Miss: Everything You Need to Know About Using Dual SIMs on the iPhone XS, XS Max & XRFollow Gadget Hacks on Pinterest, Reddit, Twitter, YouTube, and Flipboard Sign up for Gadget Hacks' daily newsletter or weekly Android and iOS updates Follow WonderHowTo on Facebook, Twitter, Pinterest, and Flipboard
Cover photo, images, and screenshots by Justin Meyers/Gadget Hacks
Finally! A Keyboard for Smartwatches That Actually Works
This is a step-by-step guide on how to set up Google Voice, whether you are using an iPhone or an Android smartphone.
AT&T Visual Voicemail - Apps on Google Play
How to stop that boarding pass from hogging your lock screen. it's easy to get rid of — if you know where to look. but it will no longer show up as a persistent annoyance on throughout
How to Get Rid of Microsoft's Annoying Ads on the Windows 10
FULLY WORKING ANDROID ON ANY iPHONE! So recently a method of installing a fully working android system onto any iPhone came out, now it is only android 5.0 lollipop that is supported right now
Android Can Now Solve the Rubik's Cube - WonderHowTo
To Break a Phone Addiction, Turn Your Screen Gray Apr 28, The Atlantic Selects What Does It Mean to Support 'Free College'?
These 4 Apps Can Help Cure Your Smartphone Addiction
Passcode Exploit: How to Bypass an iPhone's Lock Screen Using Siri in iOS 7.0.2 to Send Messages Siri Exploited—Again: How to Bypass the Lock Screen in iOS 8 (& How to Protect Yourself) How To: Open ANY App Instantly & More Securely from the Lock Screen on a Samsung Galaxy Note 2
How to lock individual apps on your smartphone | AndroidPIT
So, are you ready to unlock the bootloader of your HTC One M9? If you are, before doing anything else, read all the lines from this tutorial. gaining root access, installing custom recovery
How To Unlock Bootloader On Any HTC Smartphone
Here's everything you need to know about your Samsung Galaxy S5 including tips, tricks and hacks for beginners and advanced Android users. Disable Smart Stay. By default, the Galaxy S5's
us.community.samsung.com
Search query Search Twitter. Saved searches. Remove; In this conversation. Verified account Protected Tweets @ Suggested users
How to Bold, Italicize, & Underline Text in Gmail for Android
What's New in iOS 12.1.2 Beta 1? Forbes reported that iOS 12.1.2 beta 1 does indeed fix an issue that causes popping or stuttering when using music apps on iPad Pro.; There is also a well
Apple Releases iOS 12.3.1 With Fixes for Messages and VoLTE Bugs
You can use iPod touch with the Apple Wireless Keyboard and other Bluetooth devices, such as Bluetooth stereo headphones. For supported Bluetooth profiles, go to
My Bluetooth Headset Was Not Detected by My iPod Touch
On your computer, go to drive.google.com. Right click the Google Docs, Sheets, or Slides file you want to save offline. Turn on "Available offline." To save multiple files offline, press Shift or Command (Mac)/Ctrl (Windows) while you click other files. Preview offline files. On your computer, go to drive.google.com.
Work on Google Docs, Sheets, & Slides offline - Computer
Apr 12, 2019 · For a midsize U.S. car in 2015, the battery made up more than 57 percent of the total cost. Phone addicts are the new You'll receive our unmatched global news coverage and two in-depth
10 reasons why your Android battery is charging slowly and
The Pixel's Ambient Display feature will wake the phone when you receive a notification, and you can choose to turn it on or off from within the Settings. Fu
Pixel: Ambient Display | Android Explained
How to Switch Your Galaxy S9's Navigation Bar to Black
0 comments:
Post a Comment