How To: Extract & Back Up All Your Text Messages & Picture Messages from Your iPhone to Your Mac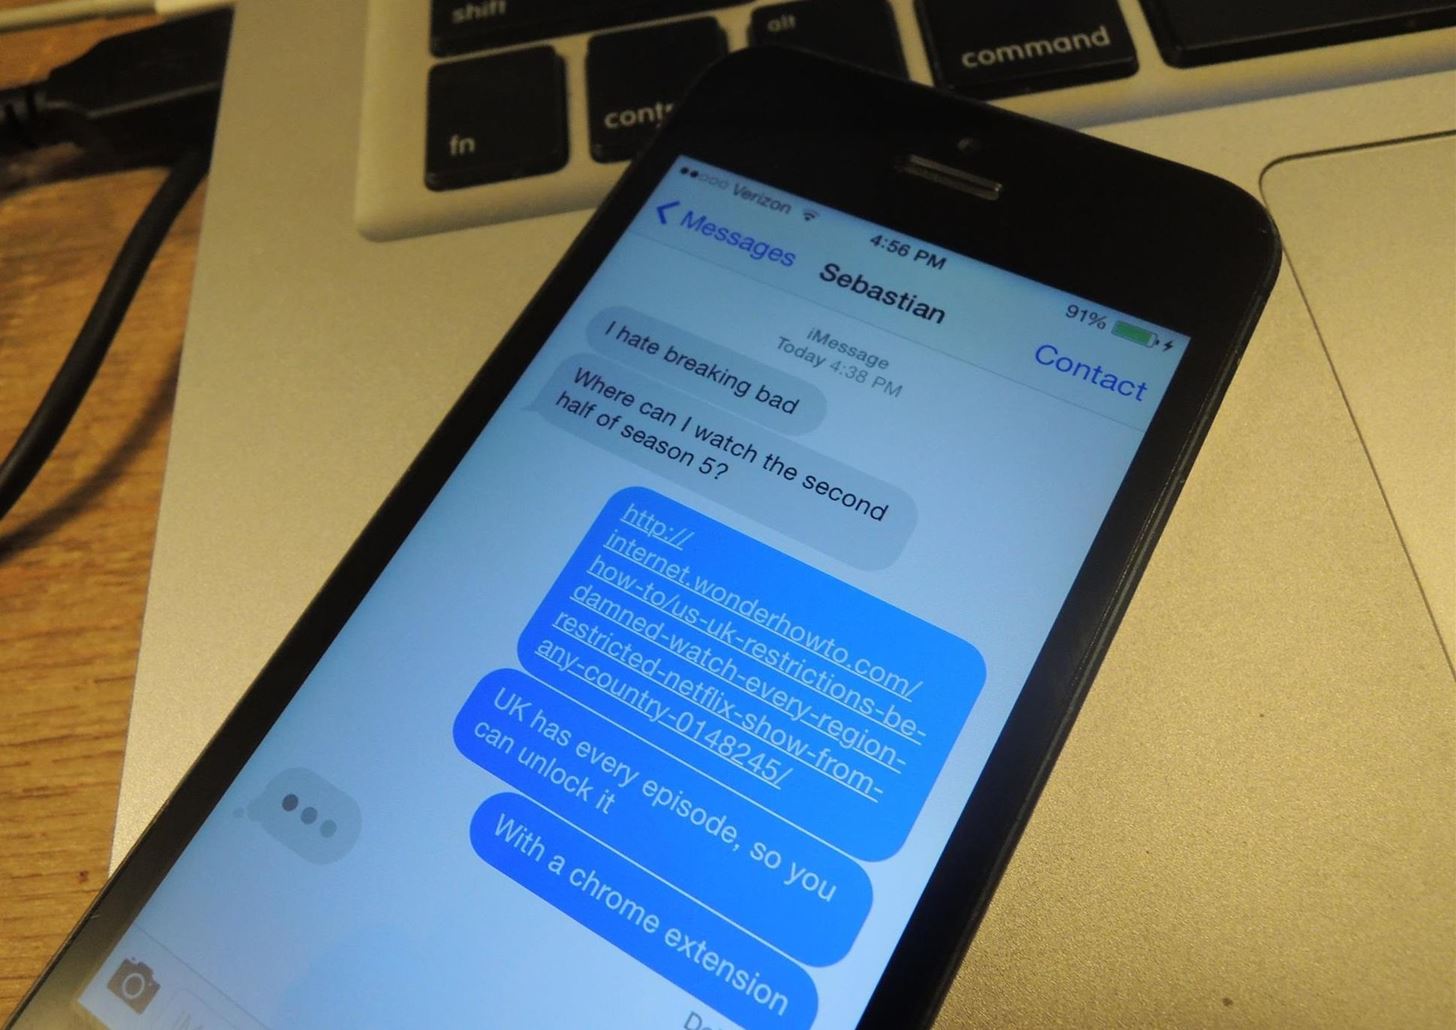
NSA aside, Apple makes it difficult for users to extract and download text messages from their iPhones onto a computer. For whatever reason (legal, devious, neurotic, etc), we've all found a time where we'd like to save backups of certain meaningful, important, or perhaps incriminating conversations (including all MMS or iMessage pictures and videos). While there are a handful of third-party applications that can help with this process, the majority of them cost money and implement certain techniques that could be shady (ex: requiring you to upload a full iOS backup to a website).Now, thanks to chelseybaker, you can easily extract all of the text messages on your iPhone and keep them on your desktop using his open-source Perl script.If the thought of working with an open source script sounds scary to you, don't worry. I'm no coder and it's pretty easy. Even if you've never seen a line of code in your life, I'll hold your hand through all the steps.UPDATE: Step 5 has been updated, since many of you were having trouble with the PERL script not running successfully. Thanks to Newell Jones for the tip!
Step 1: Back Up Your iPhoneUsing iTunes, back up the iPhone with the conversation(s) you want to download. Just Right-Click on your iPhone in iTunes and click Back Up.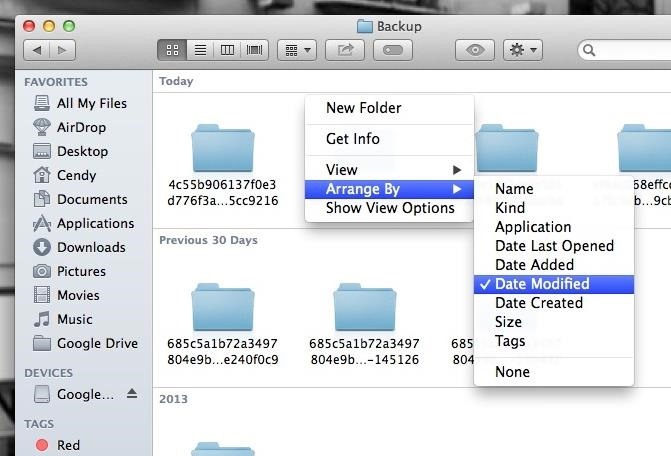
Step 2: Find Backup FolderOnce the backup is done, you'll need to find the folder where the backup was stored. To do this,—Open Finder Press and hold the Option key Click Go on the Menu Bar Choose Library Select Application Support < MobileSync < Backup Right-Click and arrange all of the folders by Date Modified. The most recent one will be your latest iPhone backup.
Step 3: Create an iOSBackup Folder on Your DesktopCreate a folder on your desktop and name it iOSBackup. This is where we're going to save everything to make running the script easy.
Step 4: Make a Copy of Your BackupCopy the backup folder you found from step 2 into your new iOSBackup folder on your Desktop. This lets us work on it without conflicting with iTunes.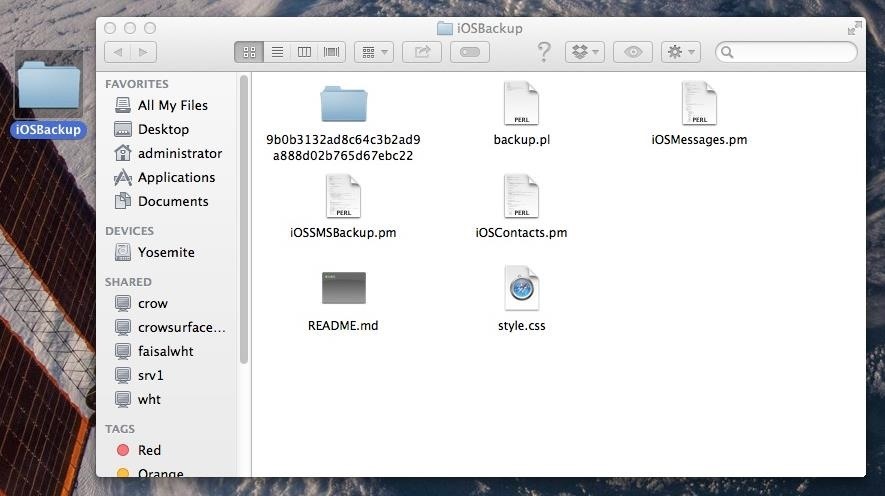
Step 5: Download iOSMessageExport FilesUPDATE: This step has been updated.Download the iOSMessageExport script from Github (or use this direct link to the iOSMessageExport zip file) and open the zip file. The downloaded script includes the following 6 files:backup.pl iOSContacts.pm iOSMessages.pm iOSSMSBackup.pm README.md style.css Copy all six files into your iOSBackup folder you created on the desktop during Step 3.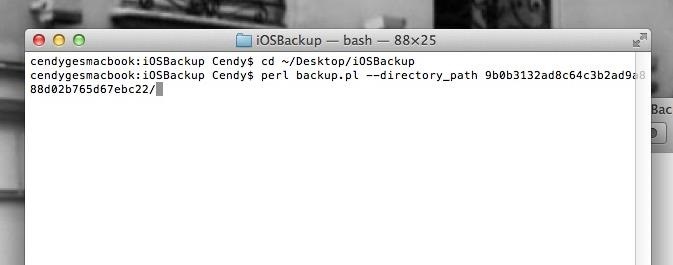
Step 6: Use Terminal to Execute the ScriptNow you'll need to open up Terminal (which you can find by hitting Command+Spacebar and typing "Terminal").Type the following Command to change to your iOSBackup folder:cd ~/Desktop/iOSBackup Now you'll need to enter one more command to execute the script. Using the command below, replace the "<folder>" part below with the name of your backup folder (the long string of letters and numbers):perl backup.pl --directory_path <folder>/Note: Be sure to include the forward slash at the end of it and press enter, as seen below: After pressing enter, head back to your iOSBackup folder.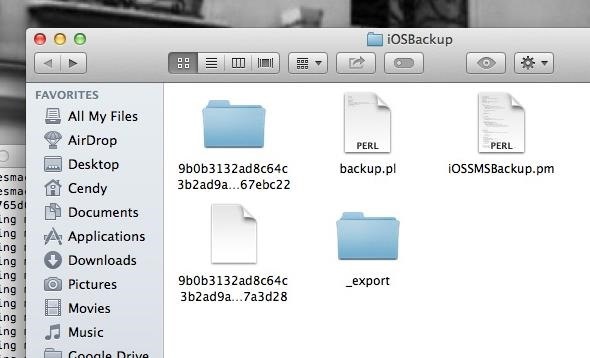
Step 7: Open Text MessagesIn the iOSBackup folder you created, you will now see an _export folder. Open it and you'll find folders for all the conversations you've had, each one consisting of HTML files that make up the text messages and images. You'll find multiple HTML files in each folder, as the text messages are grouped by days. Next to certain HTML files you'll see corresponding folders containing any pictures you were sent with that text message. If you click the HTML file your web browser will open up, showing your text message conversation with pictures included. Note that Emoji will only show up if you open the html files in Safari. And there you have it. All your raw text message data. Backed up and organized. You can now use spotlight to search them, or make copies of any of the images or videos. If you'd like, you can print-to-PDF to convert them to an easier-to-share format.
How to Download Additional Camera Modes - Samsung Galaxy S6
With archiving set as the action for discarding mail, you can still delete from the archiving button but not by swiping; you have to select More > Move Message and then select Trash. Tap Account at the top of the screen or swipe in from the left edge of the screen to return to the previous screen.
How To Set Swipe Gestures in the Gmail App - ccm.net
How To: It's Raining Sweets and Treats! How to Make Your Own Pneumatic Candy Cannon How To: Make a PVC Hand Pump to Move Water, Compress Air, & Create Vacuum How To: Build a high-powered air cannon that shoots rolled up T-shirts How To: Make a Super Cheap One-Way Check Valve
A Simple Compressed Air Cannon Made from PVC Pipes! Powerful
Enable Dark Mode in Microsoft Edge. The Microsoft Edge web browser included with Windows 10 also has a dark theme. However, its dark theme option is entirely separate from the Dark Mode option in Settings for some reason. To activate the dark theme in Edge, click the menu button on the toolbar (the icon with three dots at the far right side
How to Enable / Disable Hidden Dark Mode in Windows 10
techknowzone.com/how-to-enable-or-disable-dark-mode-in-windows-10/
After you have activated Dark Theme it is useful while using the Laptop or PC at night or in low light conditions to decrease the strain on your eyes. If you want to Disable Dark Mode in Windows 10 follow the steps mentioned below. How to Disable Dark Mode in Windows 10:
How To Enable The Hidden Dark Mode in Windows 10 - YouTube
Subscribe to softModder:
The mecha possesses one of the Attributes in the table below from BESM d20: Mecha Point Cost: 40 Mecha Points per BESM d20 Character Point. Step 11 Choose Exotic Abilities Some mecha have exotic abilities that are the product of advanced superscience or even magic. The GM may forbid some or all Exotic abilities, especially if the game is
Shoot Projectiles from One Device to Another with DUAL
The simplest way to root the Droid 2/X is to use the Framaroot One-Click Root program. In order to use this program, you will need to set your phone to be able to install programs from sources other than the Play Store. Press the Menu button on your phone while on the Home Screen. Select Settings and then click the Applications button.
How to unlock a Verizon CDMA Motorola Droid X to use with
In a bit of a strange decision, Microsoft has made it to where some users don't have a choice in the matter of applying failed automatic updates. When a Windows or driver update comes your way and fails to apply for any reason, your computer will continue to attempt applying the broken update at seemingly random intervals.
Anyway to get back that color chooser for like title bar text
How Sony Stamina Mode Can Improve Your Battery Life Vivek Chaudhary November 20, 2015 Android , How To Leave a Comment At present, number of android smartphone are available in the market.
For Sony, Android 6.0's Doze Mode Marks a Battery Life Regression
Discover the latest features and innovations available in the Galaxy Amp 2 (Cricket). Find your Galaxy phone and tablet's IMEI or serial number. Bluetooth® 4.1.
How To: Hack Your Nexus 7 into a Hybrid Android Tablet That Looks & Feels Like Both iOS & TouchWiz By Danny Luo; Nexus 7; Do you like Samsung's TouchWiz and the iPhone's user interface, but wish you could bring the best of both worlds together onto your device? You can!
How to Theme the Android System UI on Your Nexus 5
0 comments:
Post a Comment