Magisk 101: How to Switch from SuperSU to Magisk & Pass SafetyNet
It just keeps getting harder to enjoy all of the benefits of root without sacrificing features. Thanks to SafetyNet, we've lost the ability to use Android Pay, Pokémon GO, and even Snapchat to an extent. But the most recent news on this front is perhaps worst of all: Netflix has already stopped showing up on the Play Store for rooted users, and soon, it may refuse to run even if you've sideloaded the app.The fact of the matter is that if you modify anything on your system partition using root, SafetyNet will trip. Not only does this cause the Play Store to list your device as "Uncertified," but SafetyNet also provides an API that flat-out tells apps your device is modified. All of this has created a new trend: If an app has anything to do with security, payments, or DRM, you can bet it'll refuse to run on a rooted device.But thankfully, there are still ways to bypass SafetyNet. By uninstalling any root mods and removing SuperSU, then switching to topjohnwu's Magisk instead, you can enjoy almost all of the benefits of root access without touching files on your system partition. So below, I'll show you how to convert your current root setup to a truly systemless one, and when you're done, you'll be able to run any app you want.
Don't Miss: The 5 Best Phones for Rooting & Modding
RequirementsTWRP recovery installed device rooted using systemless SuperSU "Unknown Sources" enabled
A Note About Pixel DevicesBefore you get started, understand that this method will not work on Google's new Pixel and Pixel XL flagships. This is because of the Pixel's A/B partition layout for seamless updates, which breaks compatibility with the regular version of Magisk.If you're using a Pixel or Pixel XL and would still like to get these features, you're in luck. We've covered an entirely separate method that will give you root while keeping SafetyNet intact — just head to the following link to check it out:Don't Miss: How to Install Magisk on Your Pixel or Pixel XL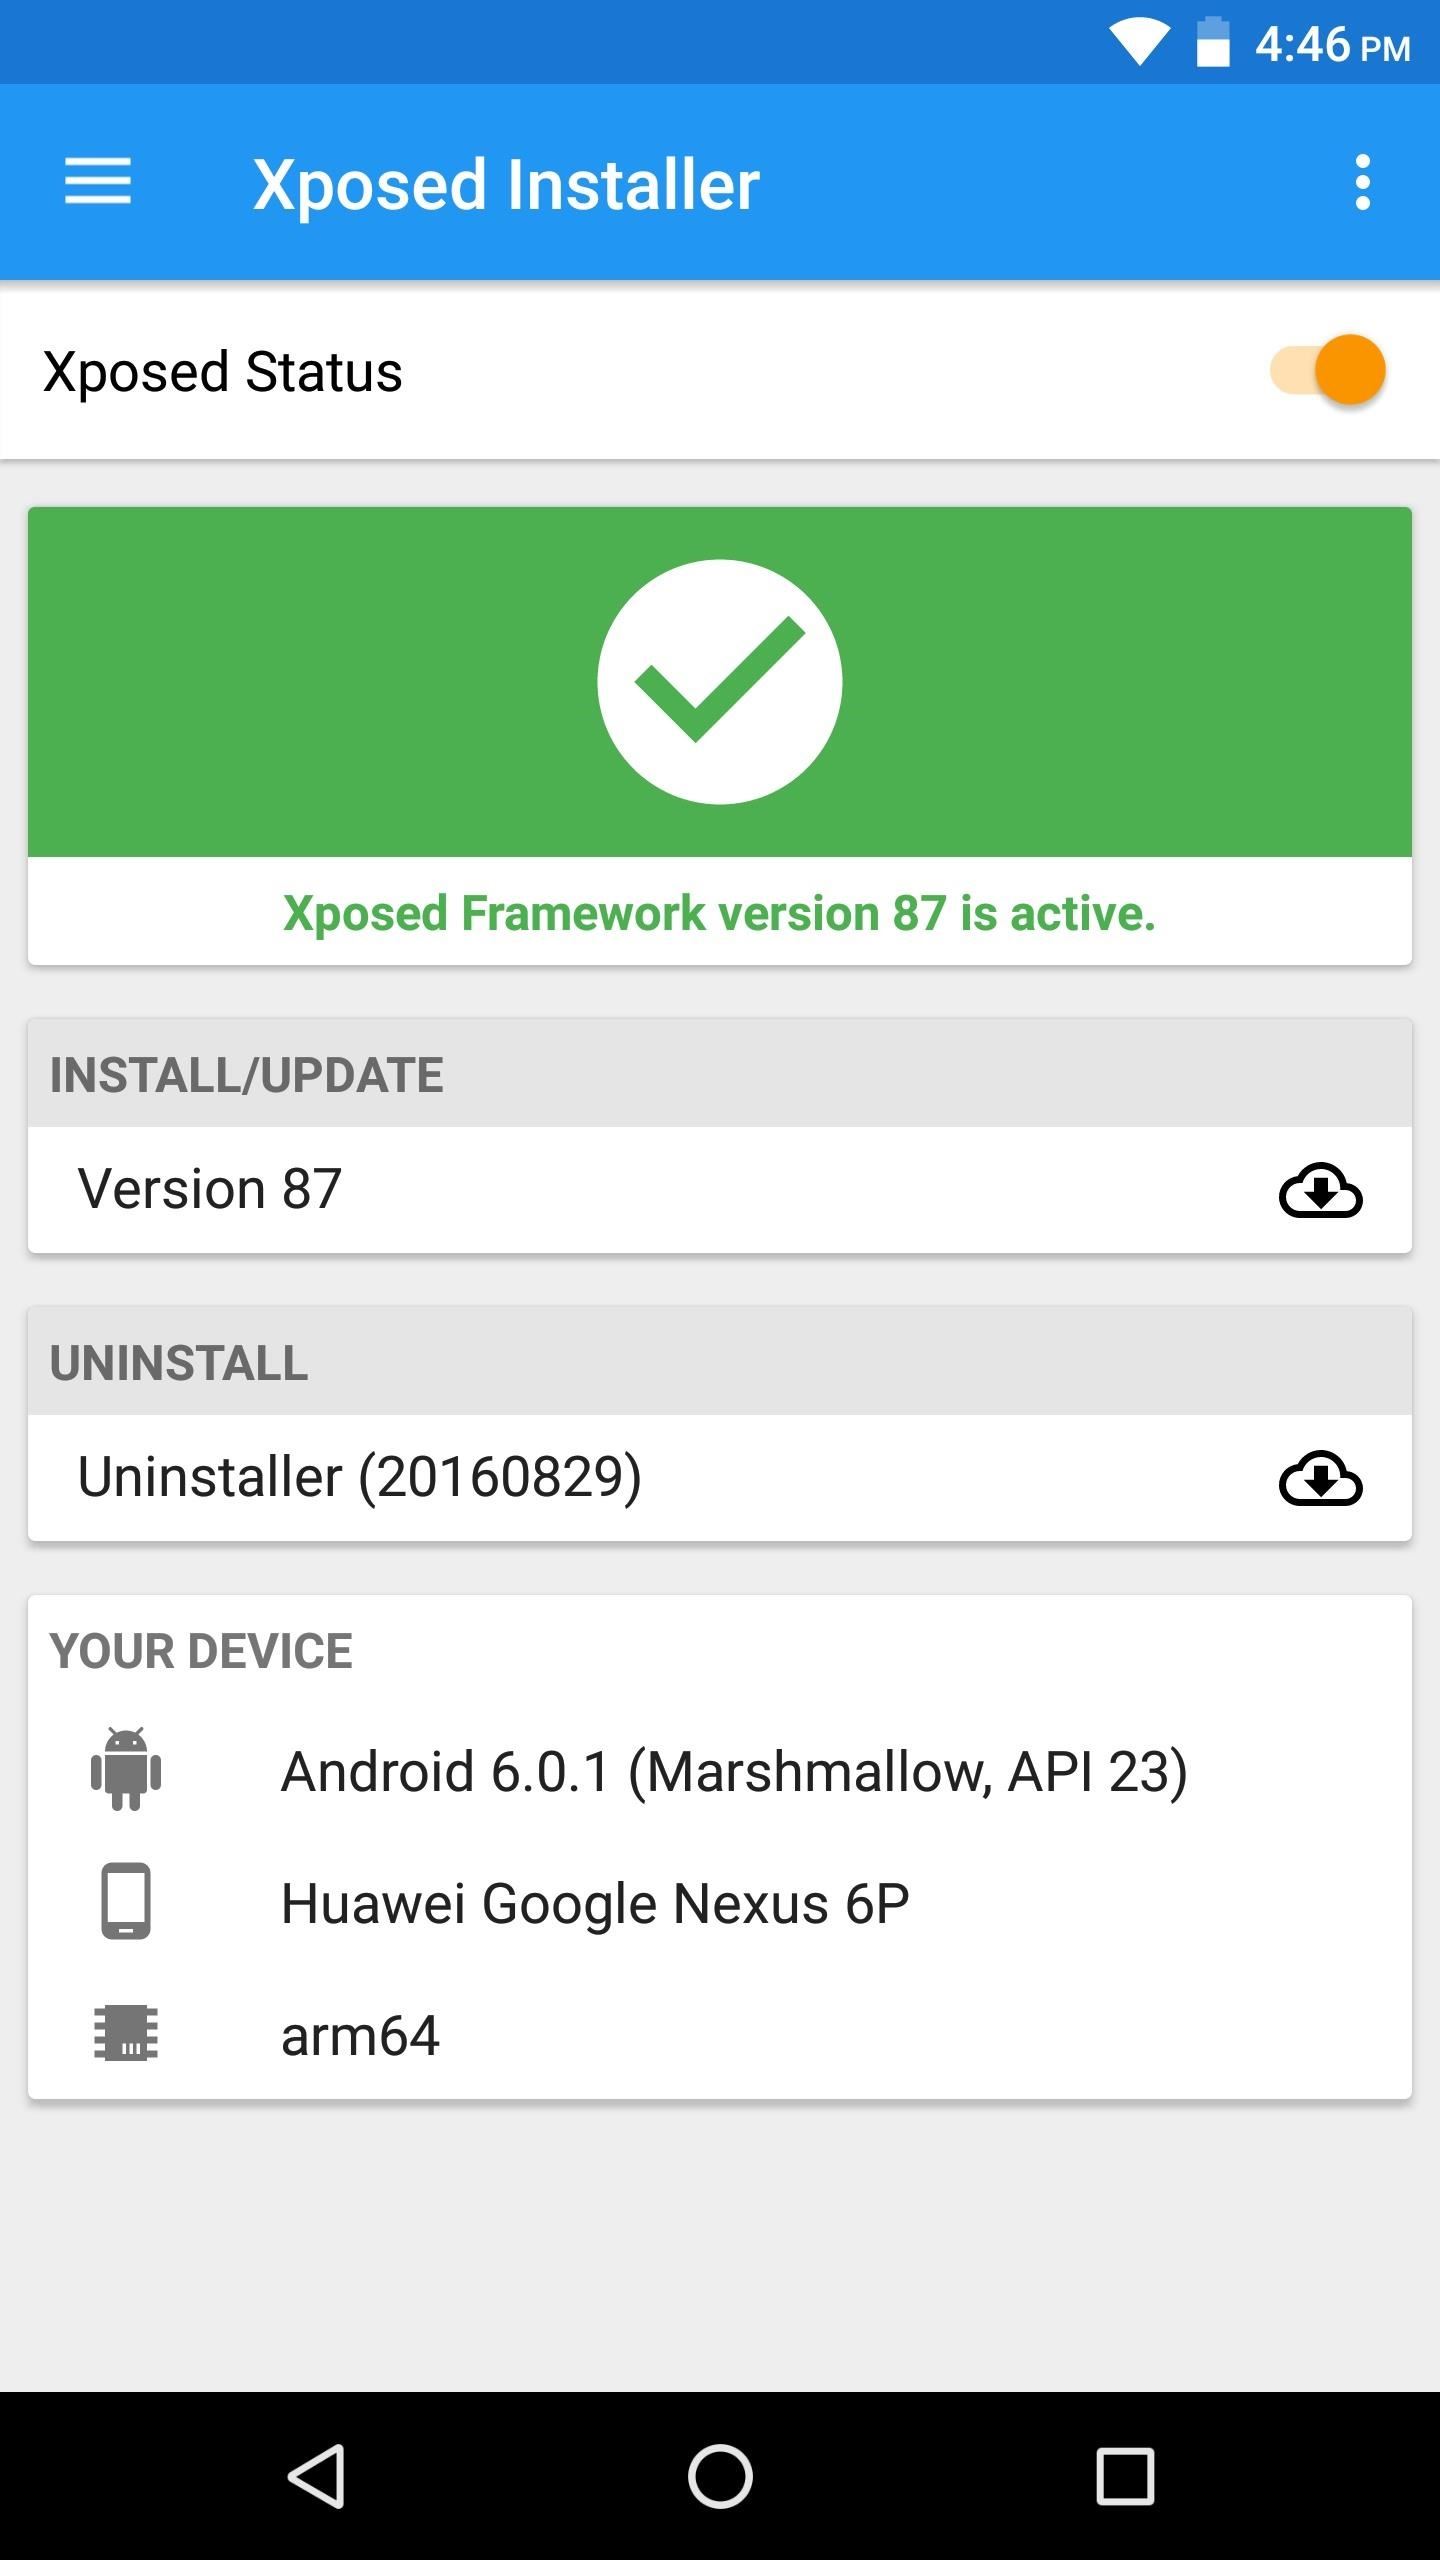
Step 1: Uninstall Xposed (If You Have It)First, you'll need to remove the Xposed Framework if you currently have it installed — but don't worry, there's a systemless version of Xposed that you can install through Magisk later.So head to the Framework section in your Xposed installer app and tap the "Uninstaller" button, then choose "Uninstall" on the popup. From there, wait a few seconds for the process to complete, then tap the "Reboot" button in the bottom-right corner. Your device may take as long as 10 minutes to boot after doing this.
Step 2: Revert Any Other System ModsIf you previously used root to modify any files on your system partition, SafetyNet will stay tripped until you revert these changes. For example, if you uninstalled bloatware apps with Titanium Backup, you'll need to reinstall the apps before you can proceed (note that disabling or "freezing" is fine). As another example, you'll also need to disable ad blocking in apps like AdAway, though note that you can re-apply these mods after rooting with Magisk.If you haven't kept track of all the changes you've made to your system partition using root, then your best bet would be to re-flash the stock system image for your particular phone using Fastboot. We've covered that process in the past, so head to the following link if you need help.Don't Miss: The Complete Guide to Flashing Factory Images Using FastbootIf your phone does not support Fastboot flashing, or if your stock system image is not freely available for download, you may have to completely restore your stock firmware (but again, only if you've used root to irrevocably change something on your system partition). This process will vary depending on your device, so do a Google search for "restore stock firmware <model name>" for further instructions.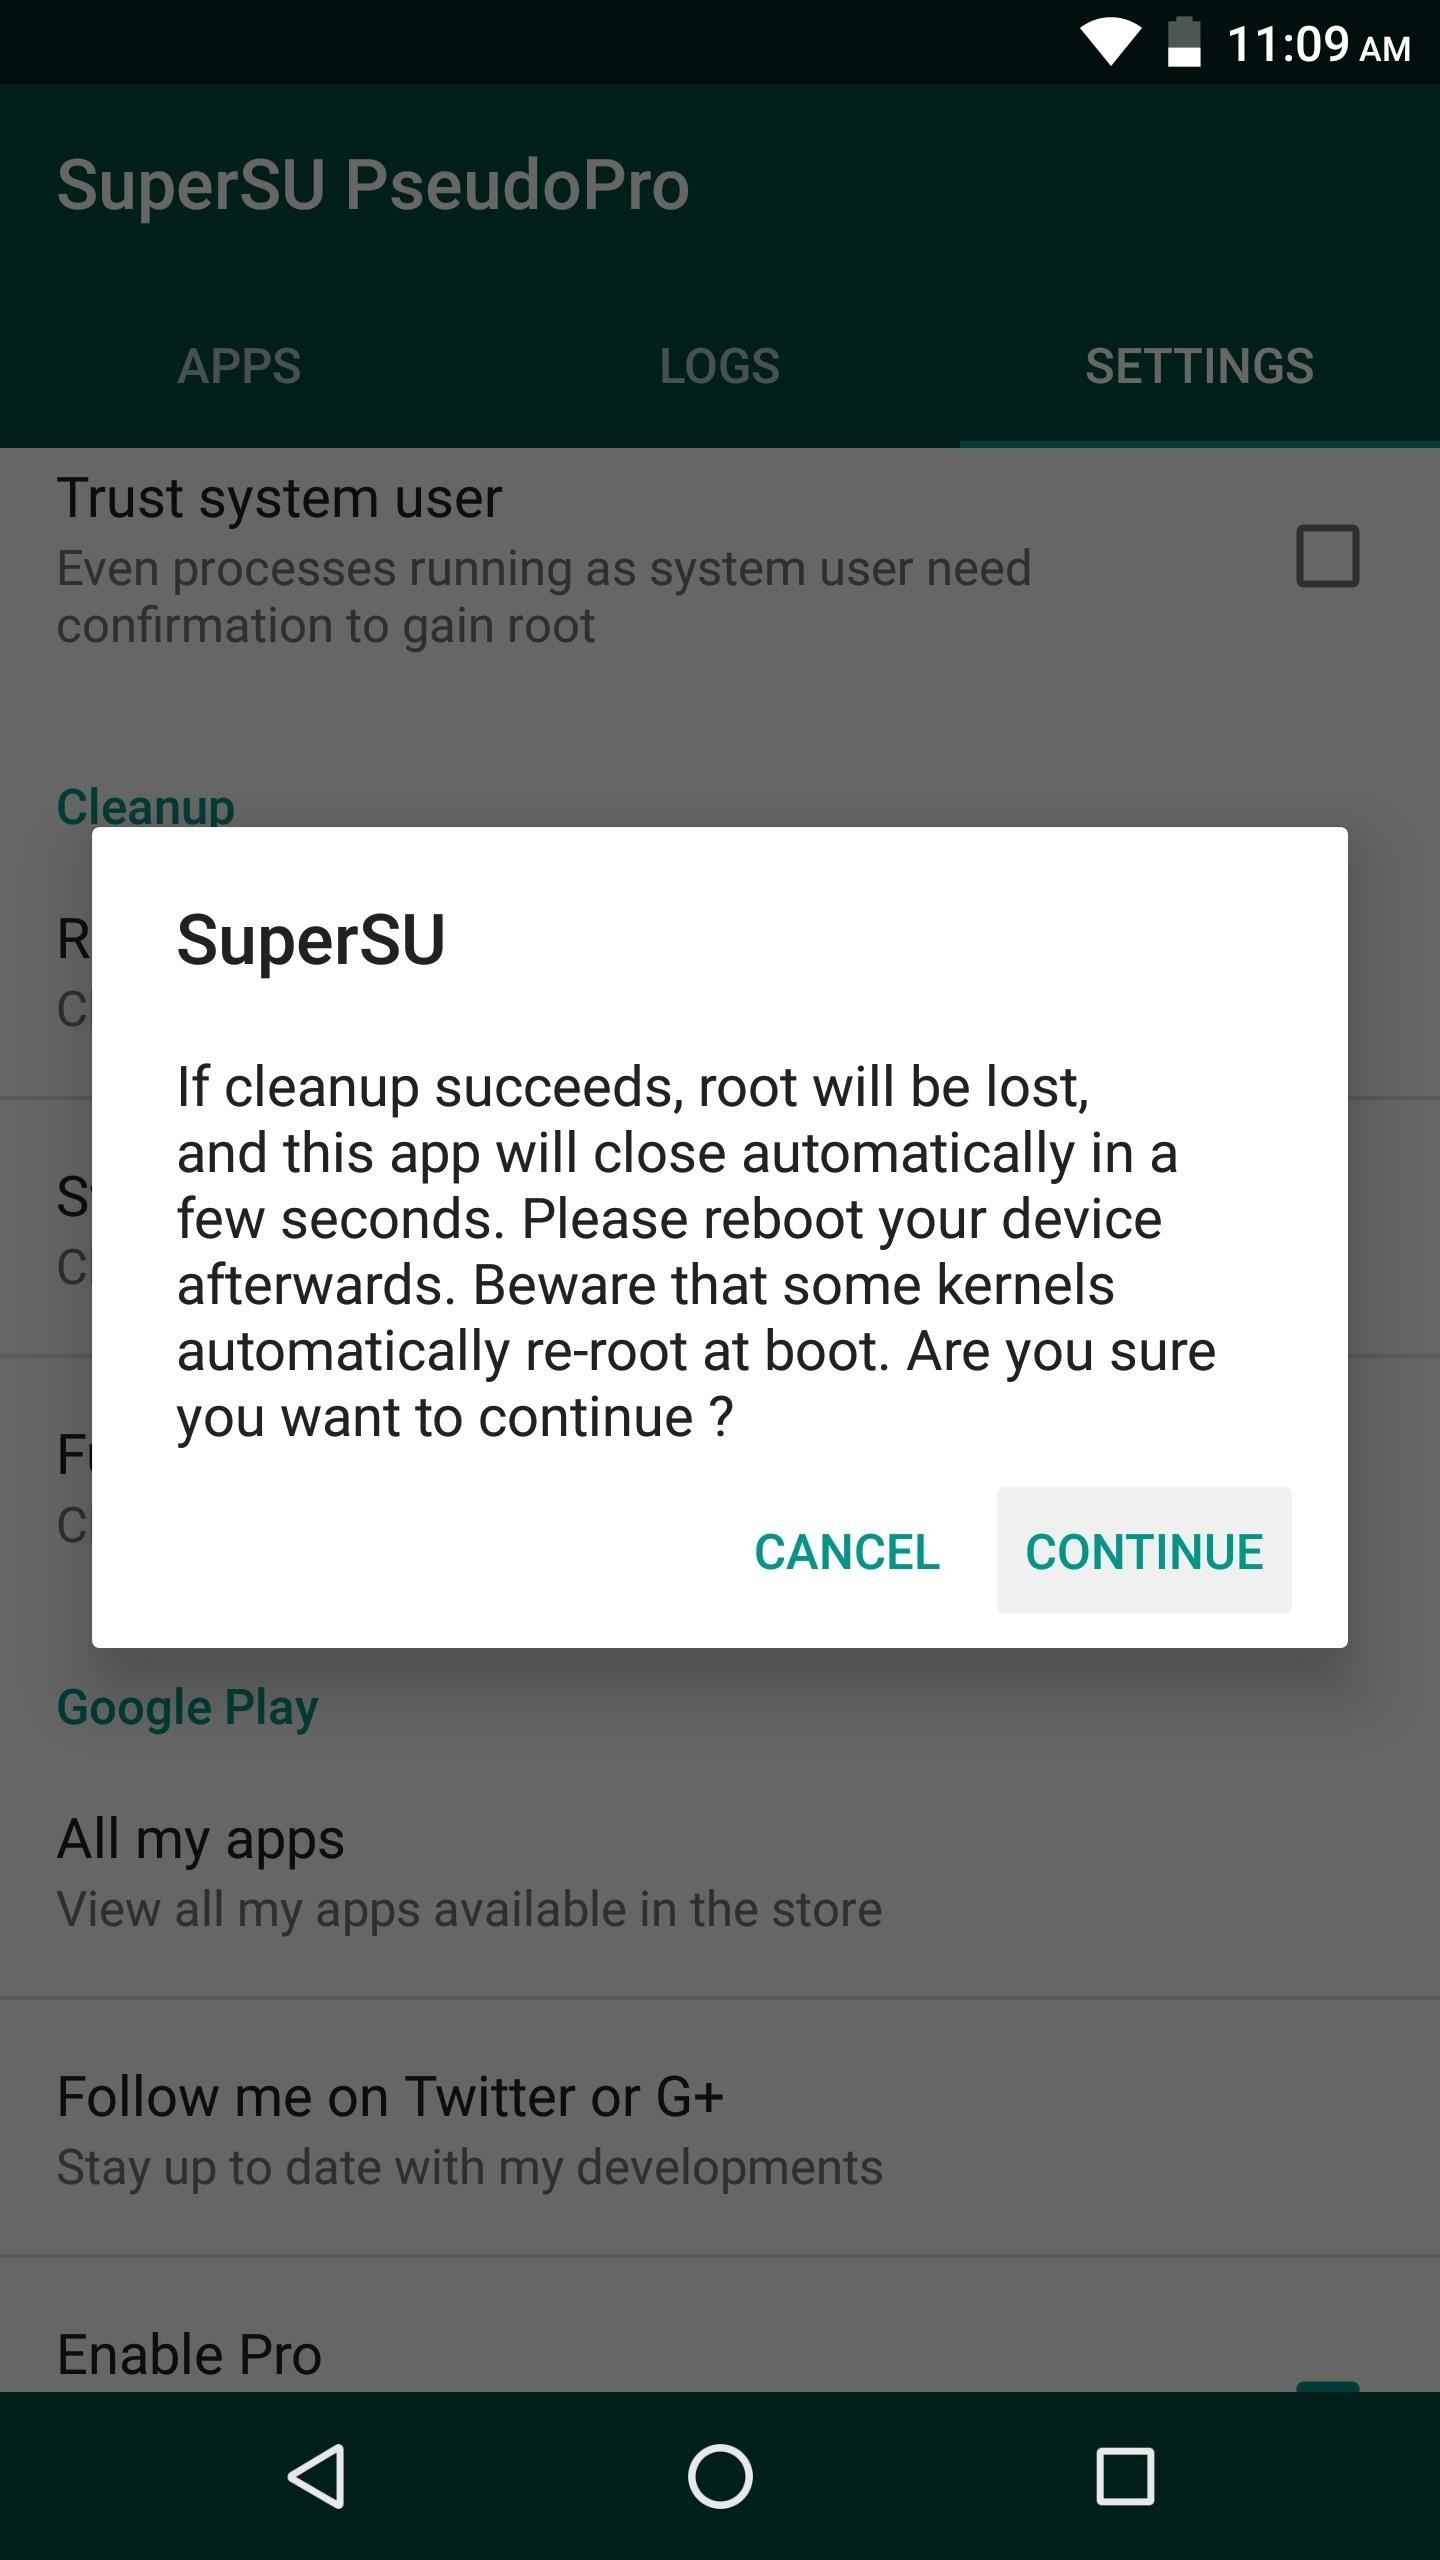
Step 3: Unroot in SuperSU & Restore Stock Boot ImageFirst, open your SuperSU app and head to the Settings tab, then scroll down and select the "Full unroot" option. From here, tap "Continue" on the first popup, then SuperSU will ask if you'd like to restore your stock boot image — make sure to tap "Yes" here. Finally, it'll ask if you want to restore the stock recovery image, but you'll still need TWRP to flash Magisk, so tap "No." After a few seconds, your phone will reboot.
Step 4: Download the Boot Image Signer (Some Phones)If your device received the May 2017 security patches that altered the Android Verified Boot process, there's an extra ZIP you'll need to flash right after installing Magisk. At the time of this writing, this only applies to Google's Nexus devices, though more manufacturers may incorporate these changes soon.So if your phone is affected by these changes, make sure to grab this ZIP and save it to your SD card or internal storage. If you're unsure, it would also be a good idea to download the ZIP, as it won't break anything even if your device is using the old Android Verified Boot system.Don't Miss: More Info on the May 2017 Security Patches & Android Verified Boot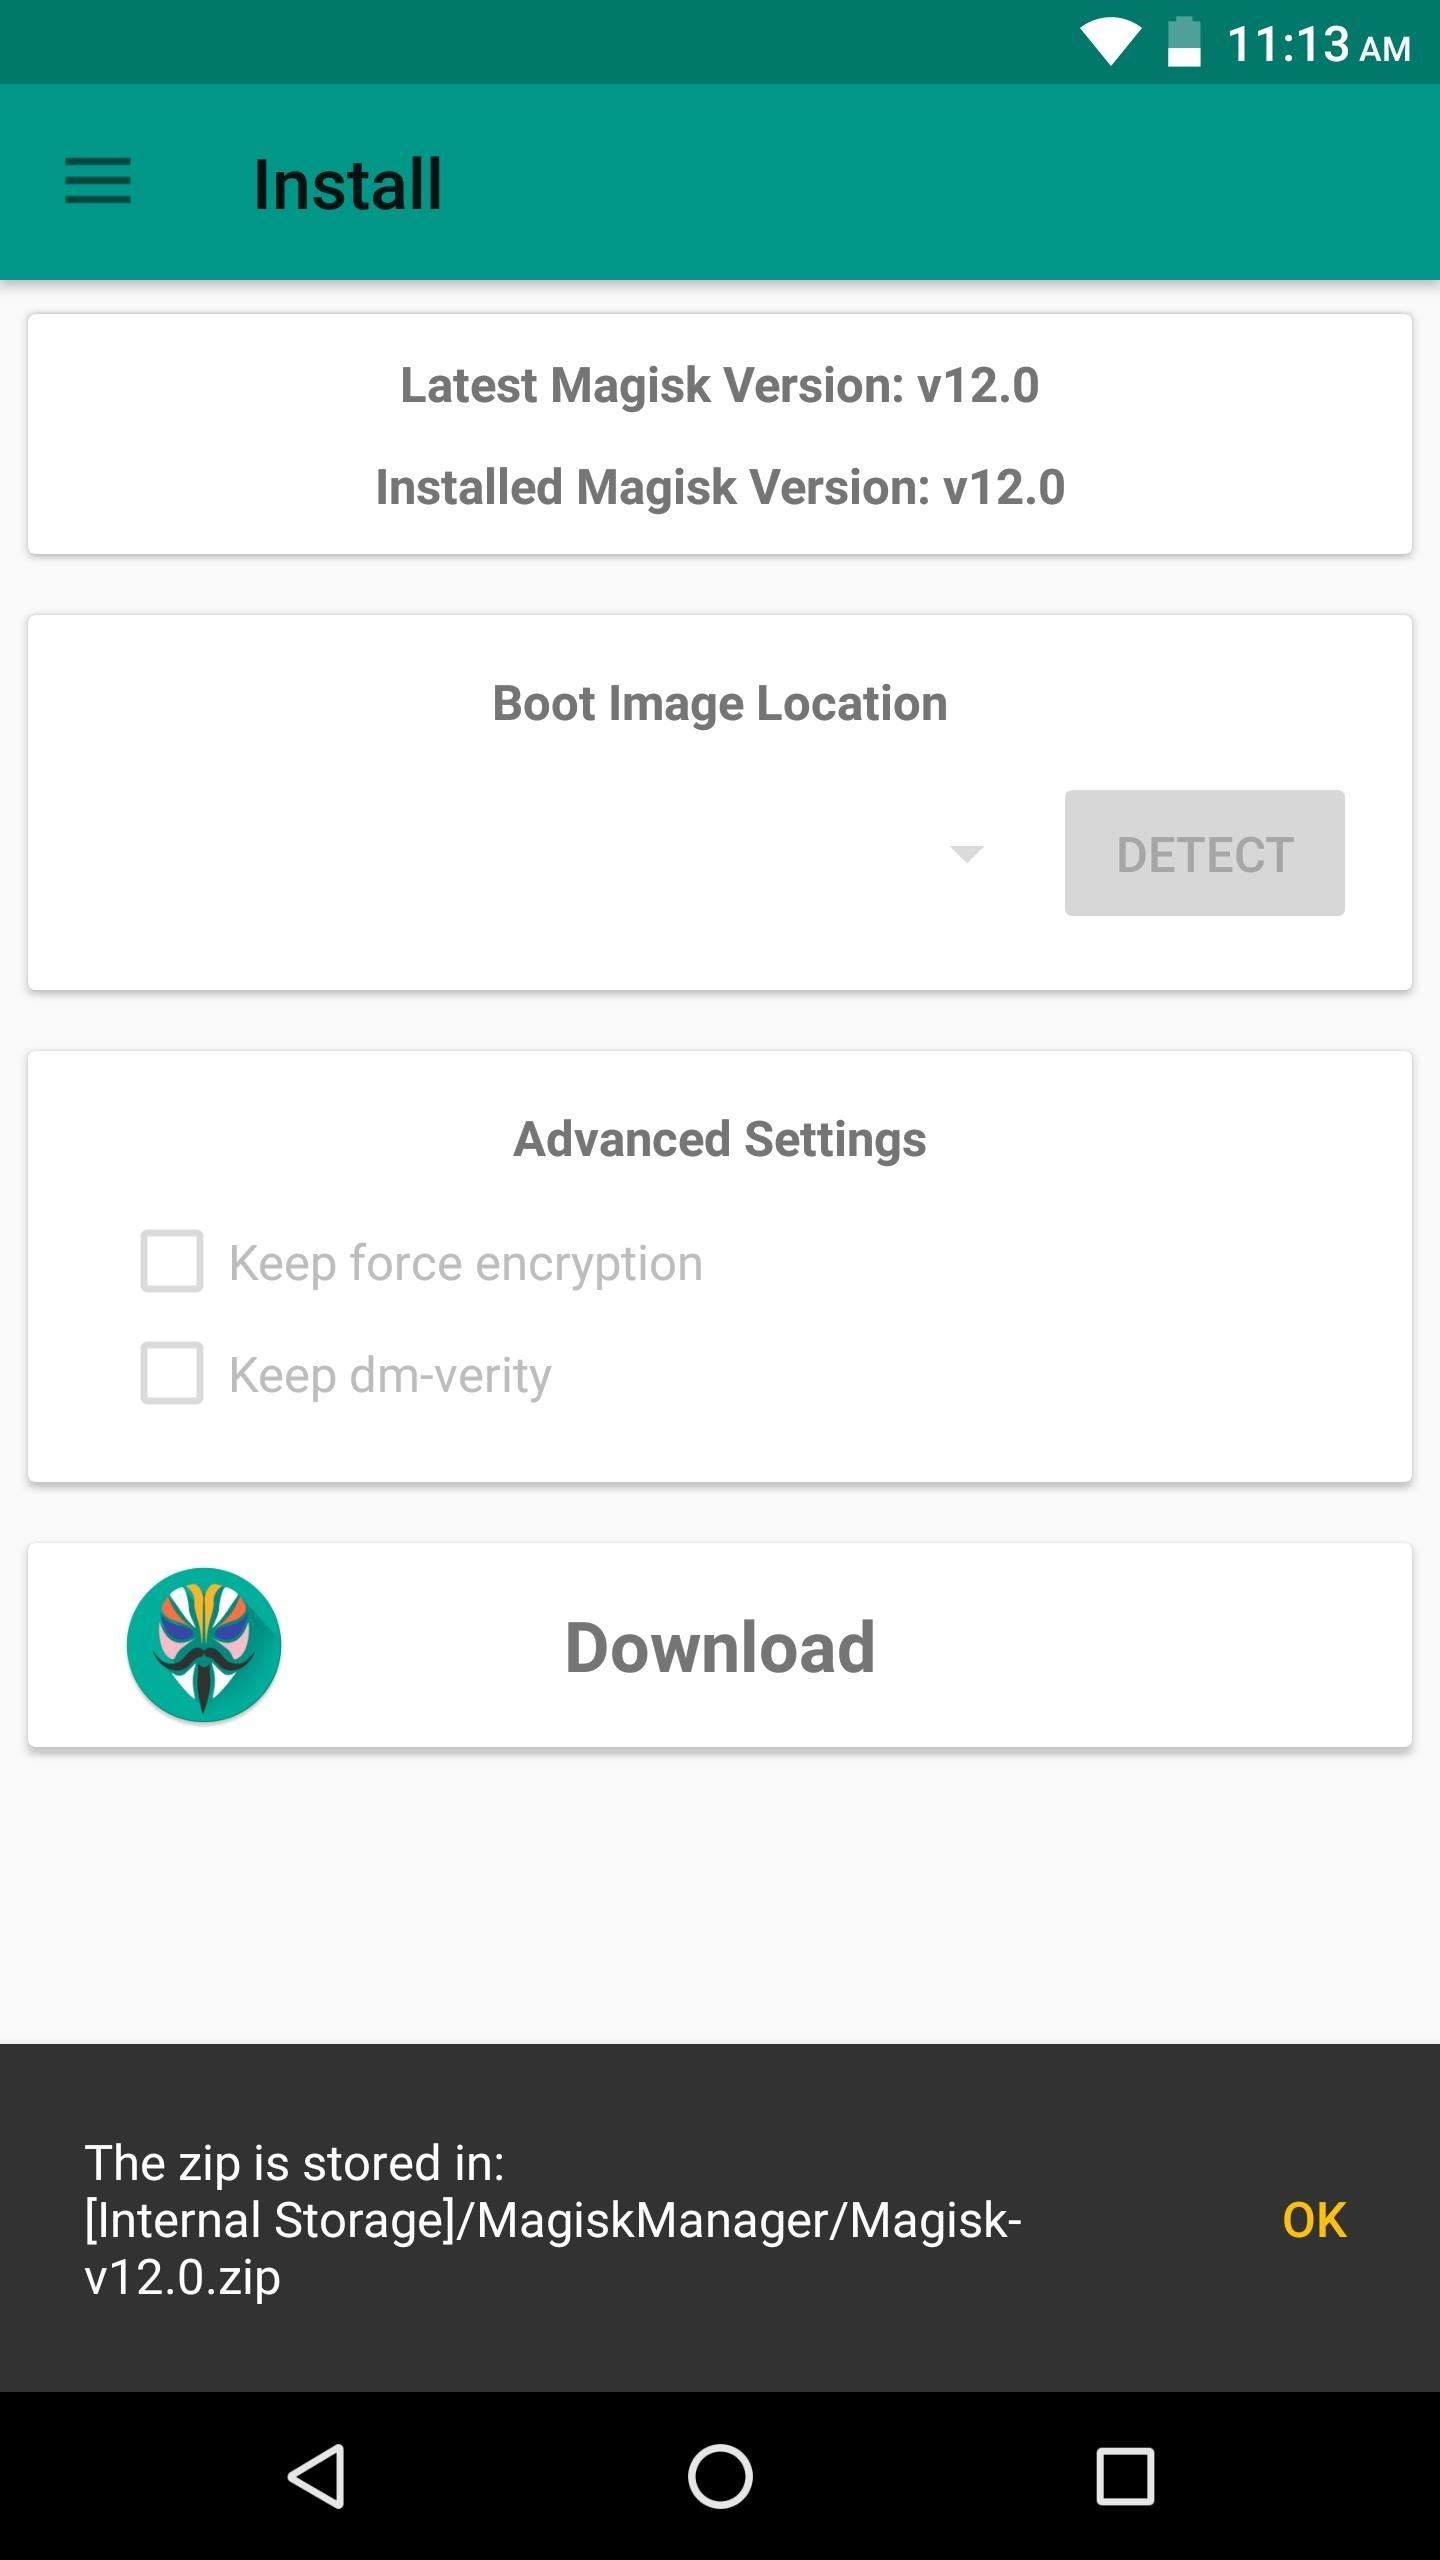
Step 5: Download the Magisk ZIPNext up, install the Magisk Manager app. From there, open the app and head to the Install section, then tap the "Download" button towards the bottom of the screen. Once the file finishes downloading, go ahead and boot your phone into recovery mode.Note: If you previously installed Magisk through the Magisk Manager app using SuperSU, you'll still have to download the flashable ZIP at this point.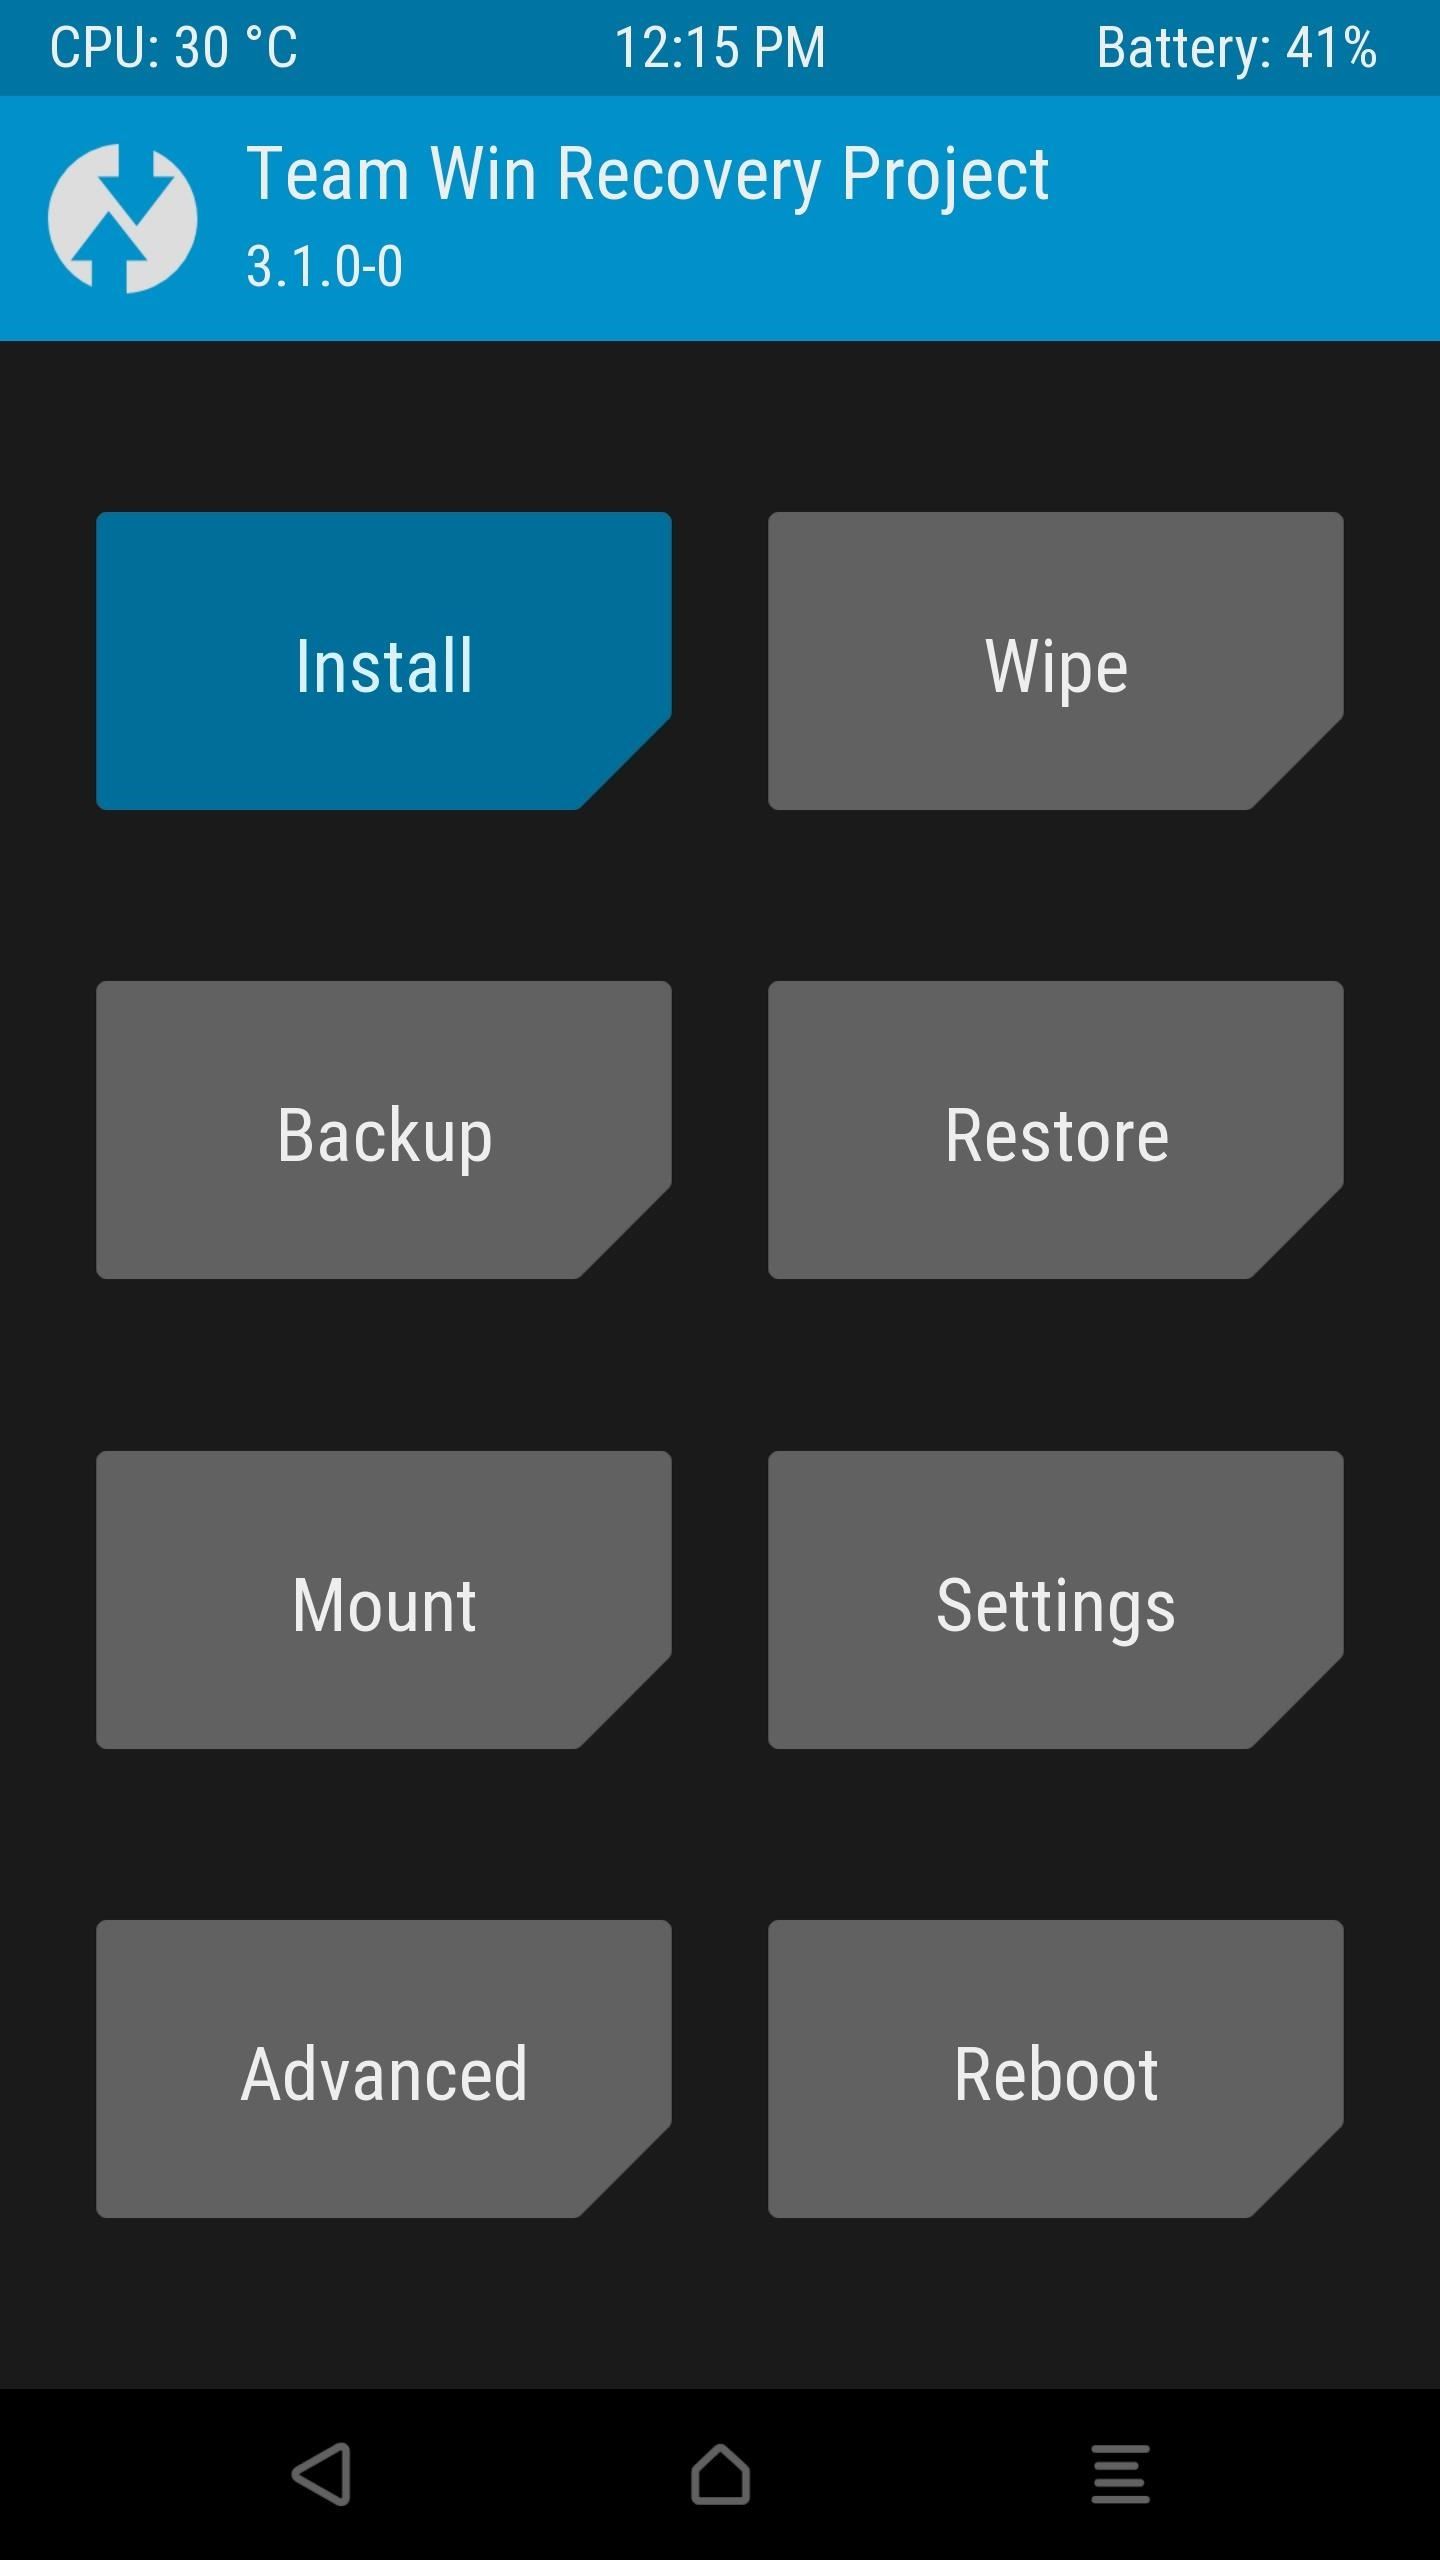
Step 6: Flash Magisk in TWRPAt this point, you're ready to flash Magisk, but it's always a good idea to make a full NANDroid backup before flashing anything, so make sure to take care of that.Next, tap the "Install" button in TWRP's main menu. From there, navigate to the MagiskManager folder, then select the Magisk ZIP file. If you downloaded the Boot Signer ZIP in Step 4, tap the "Add more ZIPs" button, then head to your Download folder and select the VerifiedBootSigner file at this time. After that, simply swipe the slider to install Magisk, then hit "Reboot System" when it's done.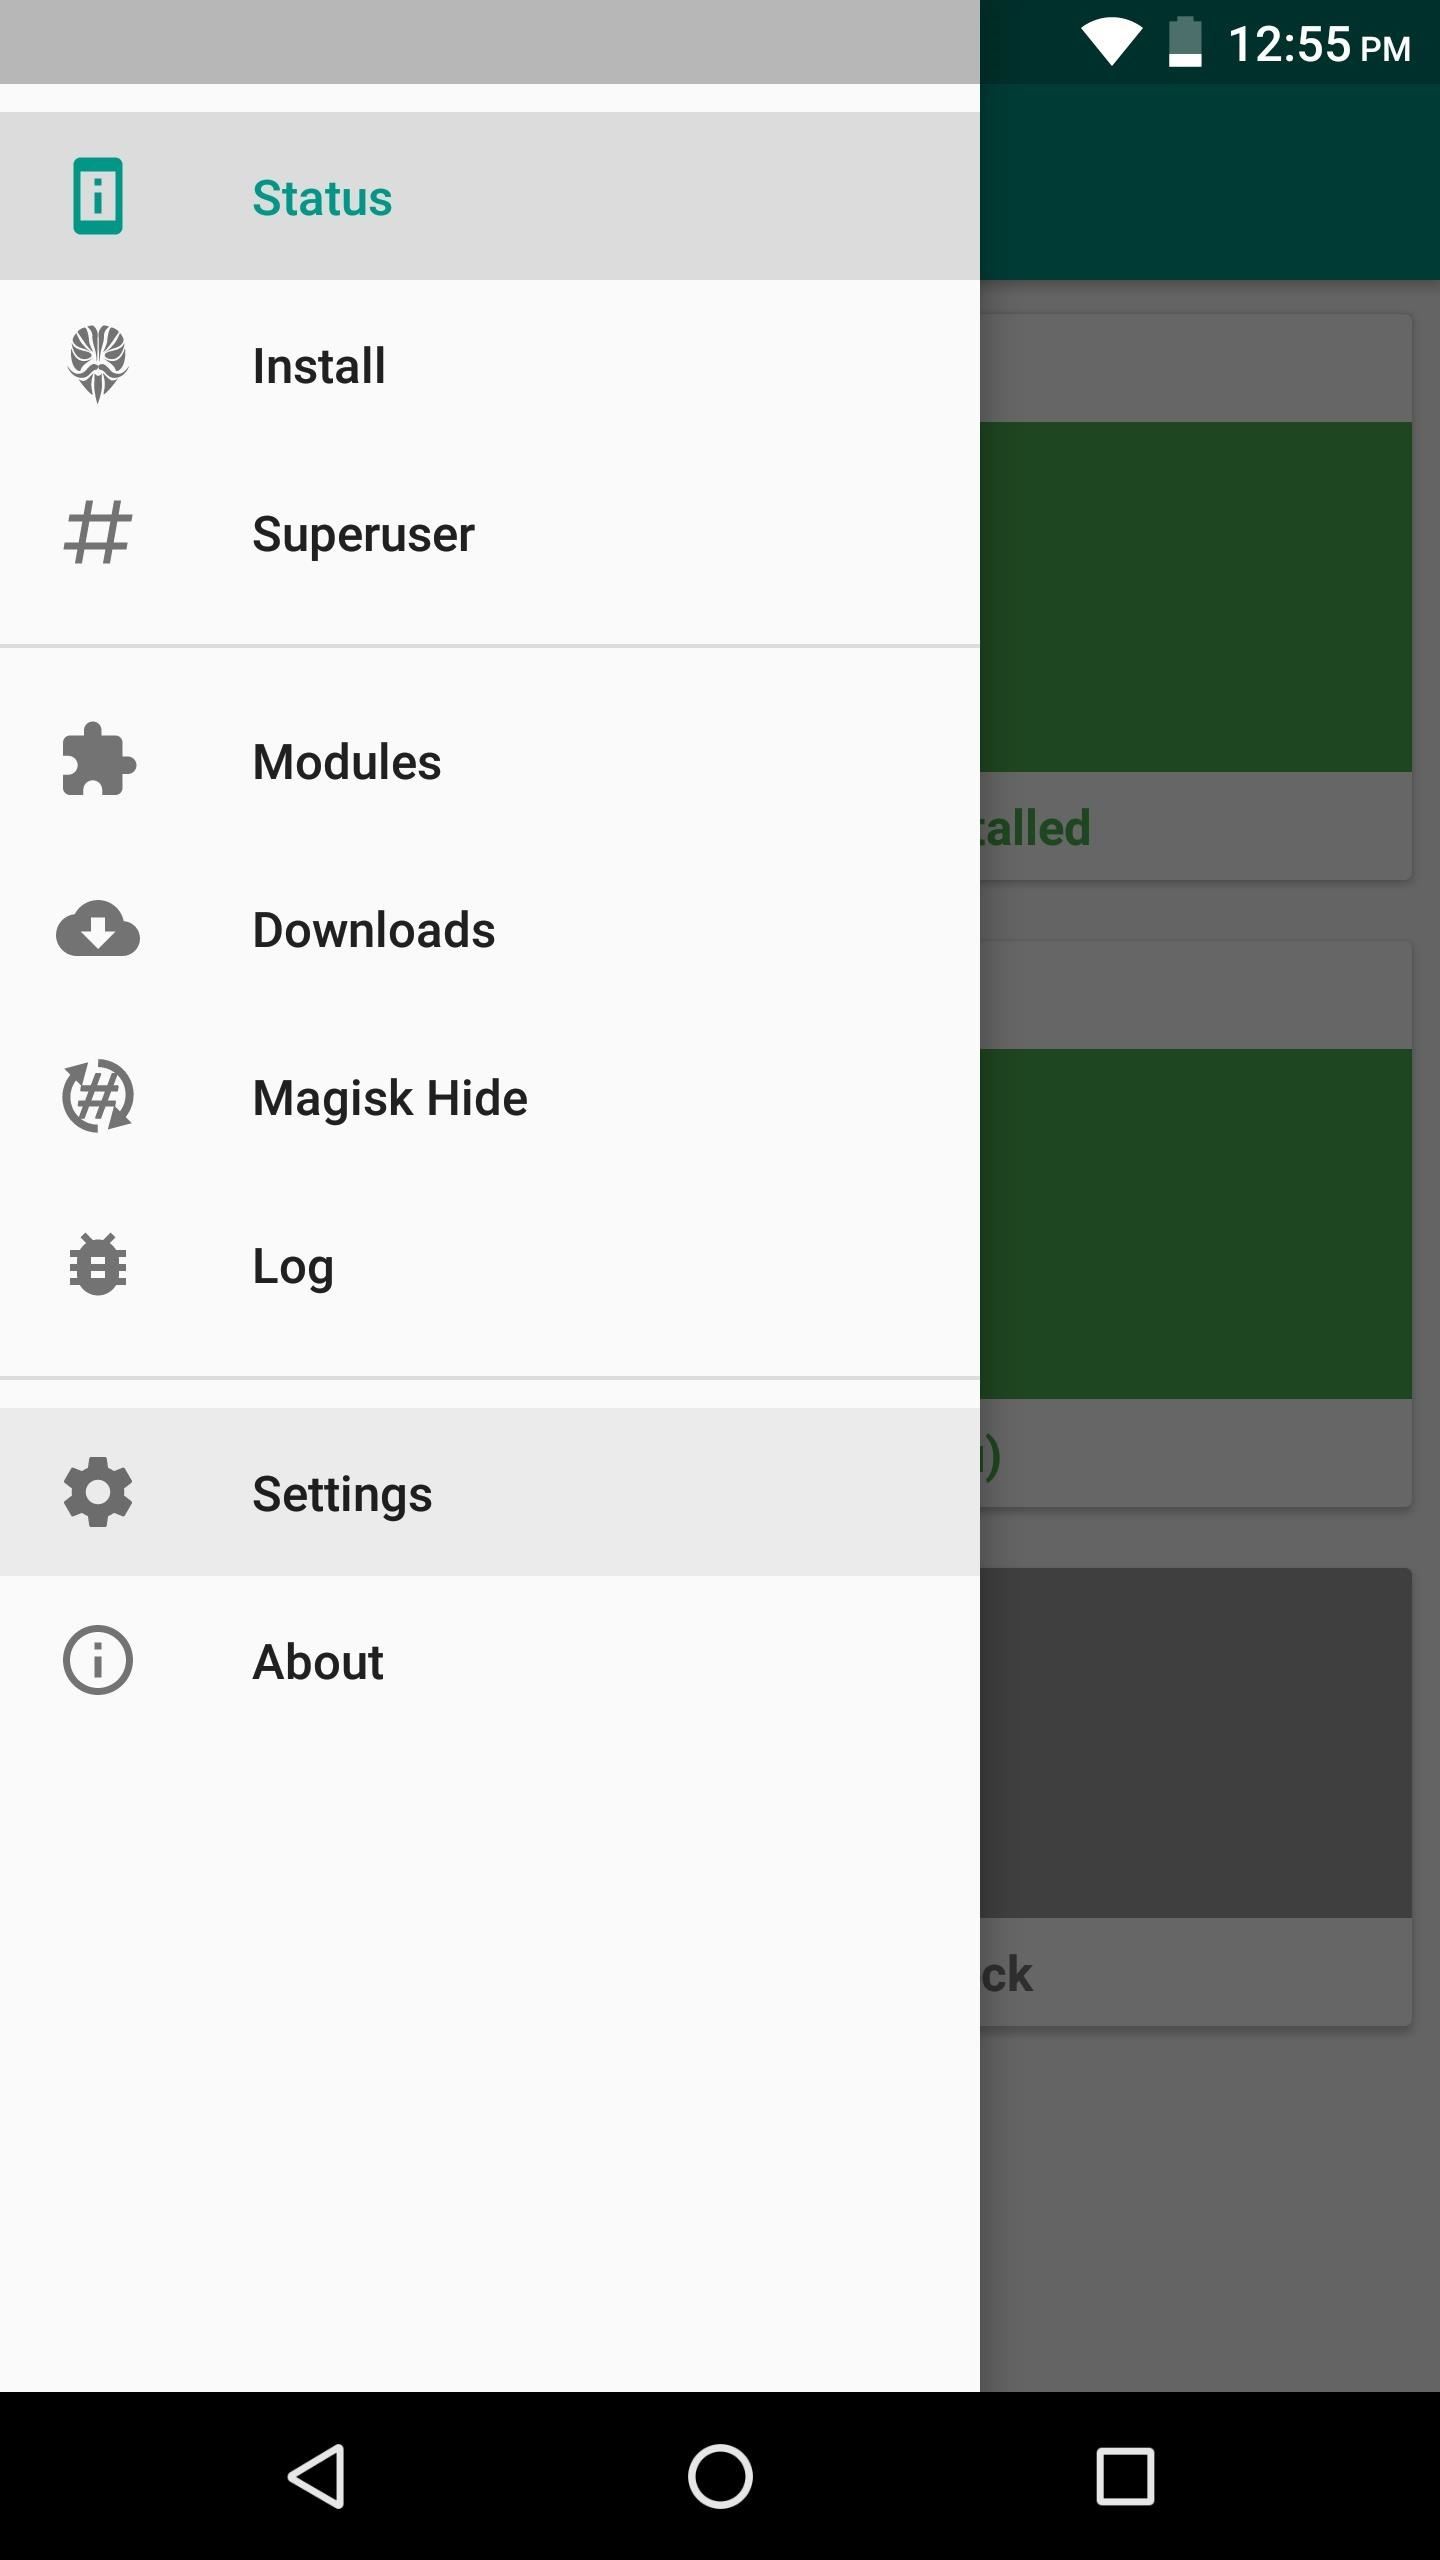
Step 7: Adjust Magisk Settings & Run SafetyNet CheckWhen you get back up, go ahead and open the Magisk Manager app, then head to the settings menu from the side navigation panel. After that, enable the BusyBox, Magisk Hide, and Systemless hosts options, then head back to the Status section. Now, if you tap the "SafetyNet check" button, you should see a message that says "SafetyNet Passed."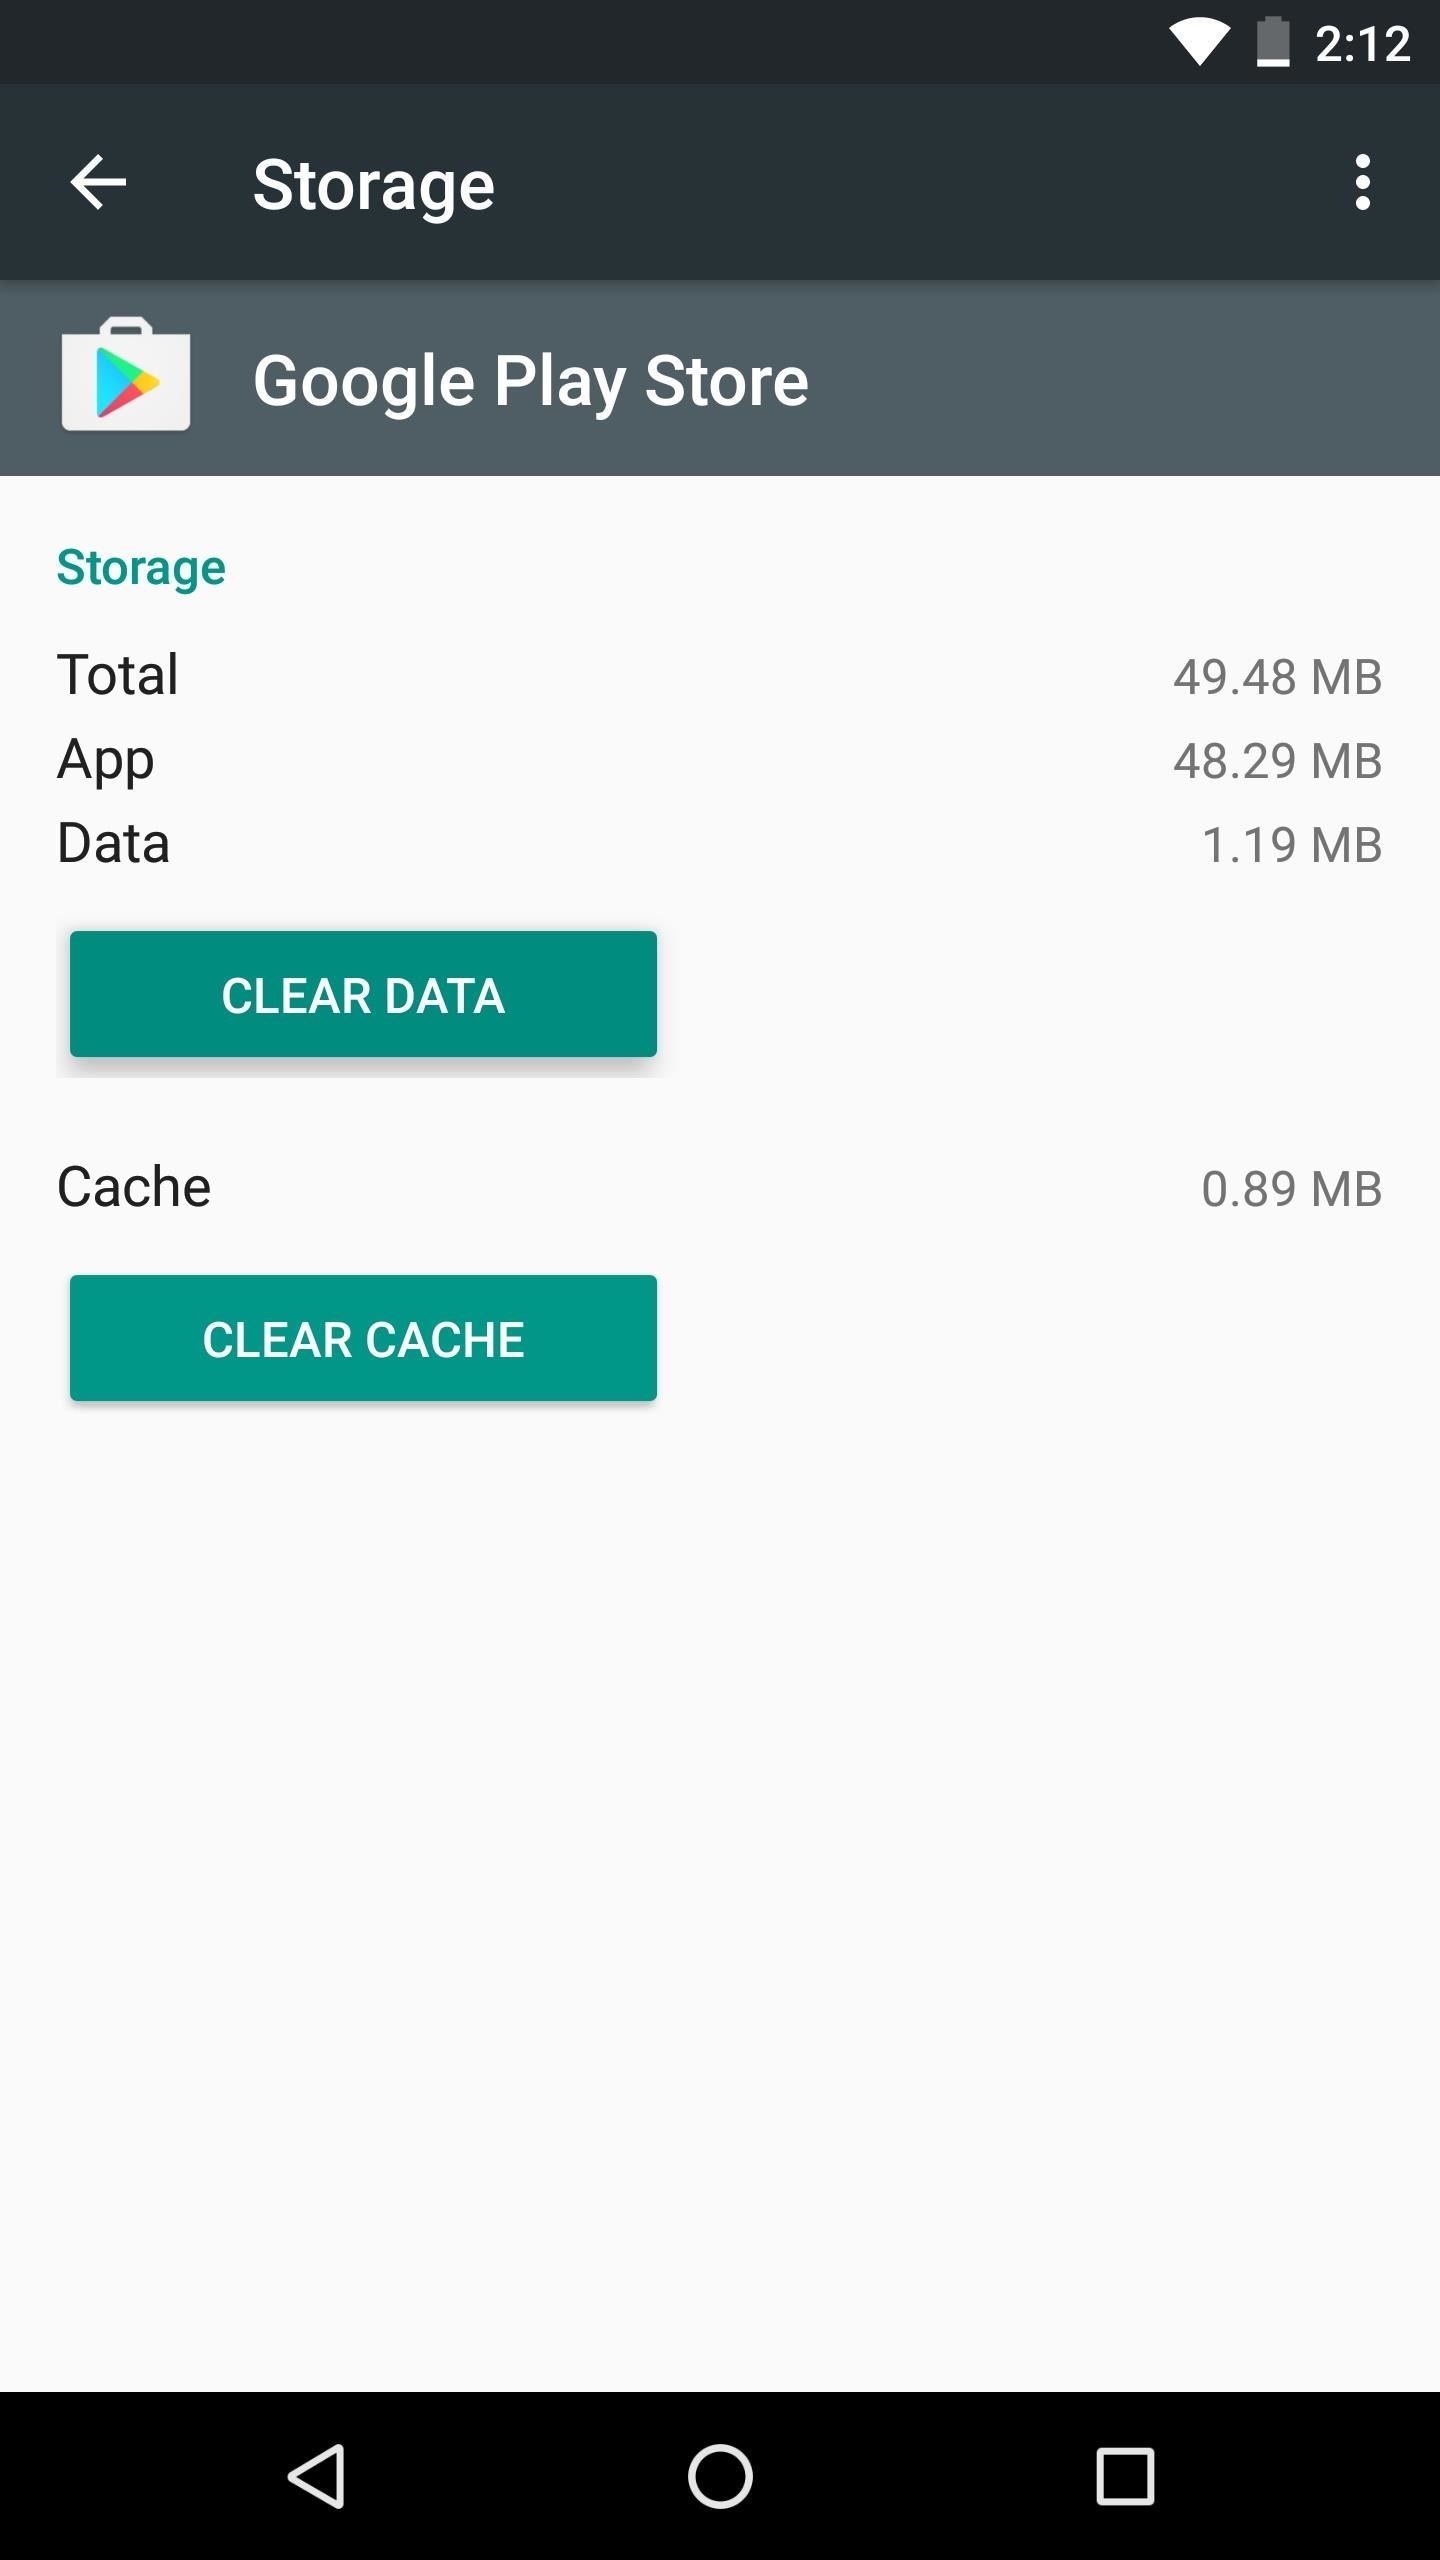
Step 8: Clear Data on the Play Store AppAt this point, the only hurdle left to clear is your device's Play Store certification. If you were previously rooted using a method that didn't pass the SafetyNet check, your Play Store app will still report that the device is uncertified.To fix this issue, head to the Apps menu in Settings and select Google Play Store. From there, tap "Force Stop," then hit "Manage Space" and select "Clear Data." When you're done there, head to the Play Store's Settings menu and scroll down to the bottom, where you should clearly see the Device certifiation field reporting that your phone is "Certified." At this point, you're free to download and use apps like Netflix, Android Pay, and Pokémon GO, because SafetyNet passed and your device is Google Play certified — even though you're rooted.
Step 9: Replace Old Root Features with Systemless ModsIf you want to get Xposed back, you can download a systemless version from the Download section inside your Magisk Manager app (though note that modules which alter system files will still trip SafetyNet). You can even download this APK if you want to use AdAway without tripping SafetyNet, so there's almost no downside to going fully systemless.Going forward, you'll have to avoid root apps that modify your system partition in any way. But that's definitely achievable, as Magisk modules can replace popular root mods without altering the system partition or tripping SafetyNet. There's one for removing bloatware, another that gives you Greenify's root features, and even one that'll convert apps to system apps. Most of these can be found in the Magisk Manager app, though a few more are hosted on XDA.So really, Magisk's systemless interface offers the best of both worlds — root-level tweaks with SafetyNet intact. The biggest difference you'll likely notice is that the Superuser access request popup looks different. This is because root will now be managed by Magisk instead of SuperSU.Why did you opt to switch from SuperSU to MagiskSU? Was it Netflix, Android Pay, or something else entirely? Let us know in the comment section below.Don't Miss: The 4 Best Phones for Binge-Watching Netflix & HuluFollow Gadget Hacks on Facebook, Twitter, Google+, and YouTube Follow Android Hacks on Facebook, Twitter, and Pinterest Follow WonderHowTo on Facebook, Twitter, Pinterest, and Google+
Cover image and screenshots by Dallas Thomas/Gadget Hacks
How To: Do Almost Anything on Your Mac Using Only a Keyboard (No Mouse or Trackpad Required) How To: Use Your Android's Volume Keys to Move the Cursor in Any Text Field—No Root Needed How To: Use the Mouse Keys feature in Mac OS X
Get Total Control Over Android's Volume Slider Precision
The iOS 13, iPadOS, macOS Catalina, and tvOS 13 public betas are coming soon. As a member of the Apple Beta Software Program, you can help shape Apple software by test-driving pre-release versions and letting us know what you think.
How to Change Font Size on iPhone, iPad or iPod Touch, Phones are getting smaller while people are getting older. So it makes sense to know what to do..
How to Change font of your iPhone, iPad or iPod touch with
Samsung Makes Multitasking Easier on the Galaxy S9 - Gadget
automatedtechnews.com/samsung-makes-multitasking-easier-on-the-galaxy-s9-gadget-hacks/
Multitasking on a smartphone has never been better, but it still has some ways to go to compete with a desktop experience. Samsung hopes to change that with a new multitasking view on the Galaxy S9, which allows the user to open notifications in a new, smaller window on top of the app they are currently using.
How to Turn Your Galaxy S10's Camera Cutout into a
If you thought your Furby was annoying as is you should try this out. Learn how to modify a Furby to run on USB power.
Usb Powered Furby « Wonder How To
Almost all leaks and rumors hints there will be four variant of G7 lineup including G7, G7 Plus, G7 Play, and G7 Power. Thanks to a continuous streak of rumors and leaks we have a pretty good idea regarding all upcoming variants of G7 series. Today we will compile all the details we know so far regarding the Moto G7 series.
Here's everything we know so far regarding Moto G6 and G6
The Home screen is best known for its humble duty of serving your application icons to your fingertips on demand, but one element of it that often get overlooked in Apple's software redesigns is the page indicator just above the Dock.
20 of the best iPhone 6S wallpapers | TechRadar
How To: Get Android's Quick Settings on Your iPhone for Instant Access to Location Services, Settings & More How To: Secretly Send Text Messages in Class or at Work Without Touching Your iPhone How To: Get a Taste of Android L's Material Design with QKSMS Messaging
Call Emergency Contacts Right from Your Quick Settings Tiles
DPI aka PPI is the density of the screen. dip is a unit for specifying size of UI stuff in a screen-density independent way. If you mean to ask if PPI value you got is the DPi value, yes. - Aswin Kumar Jul 20 '12 at 11:06
Support different pixel densities | Android Developers
You can remove apps from your Apple Watch Dock at any time. The focus of this step-by-step tutorial is on explaining how to add, remove and rearrange apps that appear in the Dock so we're going to assume your Dock is organized by Favorites, not Recents.
In this tutorial, we learn how to erase cell phone information on a Blackberry 7290. First, go to the home page of your screen the scroll to "options" and hit okay. Now, go to "security options" and click okay again. Now, click on "general settings" and click okay, then click on okay once more, and
Clear Temporary Internet Files - BlackBerry Z10 | Verizon
With the announcement of the Shellshock Bash Bug, Linux admins around the world have been scrambling to patch their Bash shells so that they're no longer vulnerable to the exploit. If you have a Fedora, RHEL, or CentOS system that hasn't reached End-Of-Life, then updating to a patched version of Bash is as simple as: sudo yum update -y bash
Shellshock Bash Bug - Byteworks
How To: Disable Read Receipts & Send Fake Camera Pictures on Kik Messenger Messages 101: How to Search Google for Places, Videos & News to Share, Right from Your Conversations How To: Fix Delayed iMessages & Text Messages After Upgrading to iOS 7
Messages 101: How to Enable & Disable Read Receipts for
You can find your info, privacy, and security settings all in one place - your Google Account. We have created easy-to-use tools like Dashboard and My Activity, which give you transparency over data collected from your activity across Google services.
Google Account
0 comments:
Post a Comment