How To: Take Better Photos with Your Phone
It's truly amazing how far smartphone camera hardware has come in such a short period of time. It took roughly 5 years to advance the image processing capabilities from a pixelated mess to the crisp and clear photos we can take today. This reaches well beyond the megapixel spec race, since camera modules these days sport vastly improved optics, wider aperture, and even larger pixel sensors that capture more light.Don't Miss: The 5 Best Free Camera Apps for Android Truth be told, cameras are so powerful in the latest-generation flagship devices that "smartphone photography" is becoming a real thing. We no longer have to mask all of our phone pics with overbearing Instagram filters to make them look halfway decent, and we can actually start using some traditional photography methods. So to get you started off on the right foot, I'll go over five simple photography tips that now also apply Android, iPhone, Windows Phone, and other types of smartphones. 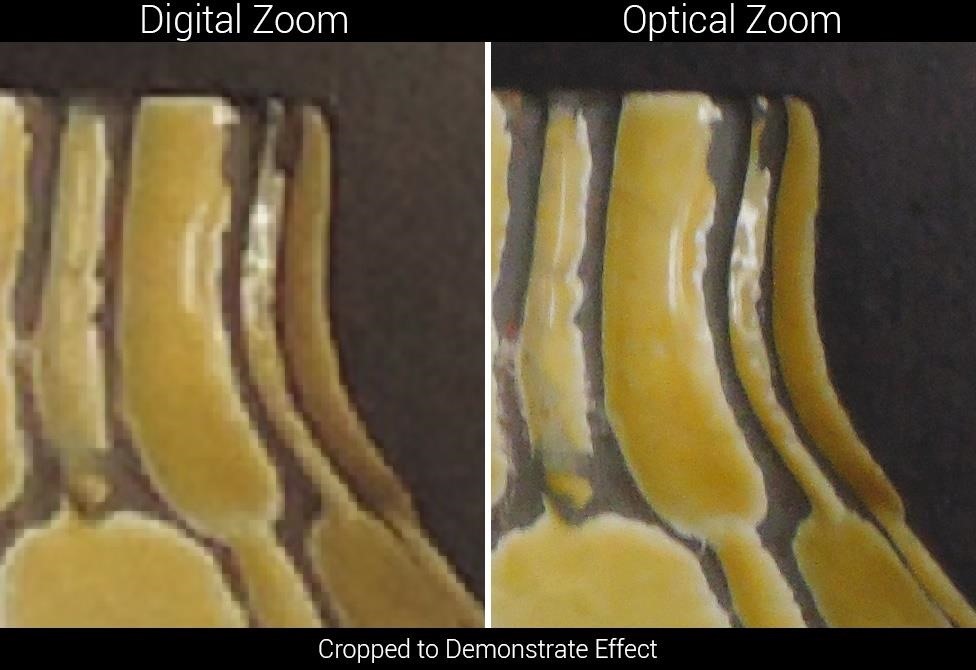
Tip #1: Never Use Digital ZoomThere's a huge difference between optical zoom and digital zoom, and understanding this distinction can greatly improve the quality of your pictures. Optical zoom works like a telescope or a pair of binoculars—a set of lenses with magnifying properties are physically moved towards or away from one another to bring the focus point closer or further. Digital zoom, on the other hand, works like zooming in on an image using your computer, so as you get closer, the underlying pixels become bigger and more noticeable. The vast majority of smartphone camera lenses are still not capable of optical zoom, since they have to be compact enough to fit in the back of your phone, which rules out multiple layers of mechanically-operated lenses. This means that any zooming you do with your smartphone camera is of the digital variety (unless you buy an attachable lens for it), which only serves to increase the size of the underlying pixels, making the image pixelated as a result.In lieu of optical zoom, do your best to physically bring your smartphone closer to the subject of your photo. If this isn't possible, simply crop the photo after you take it, which would effectively be the same as digital zoom, except it offers more control.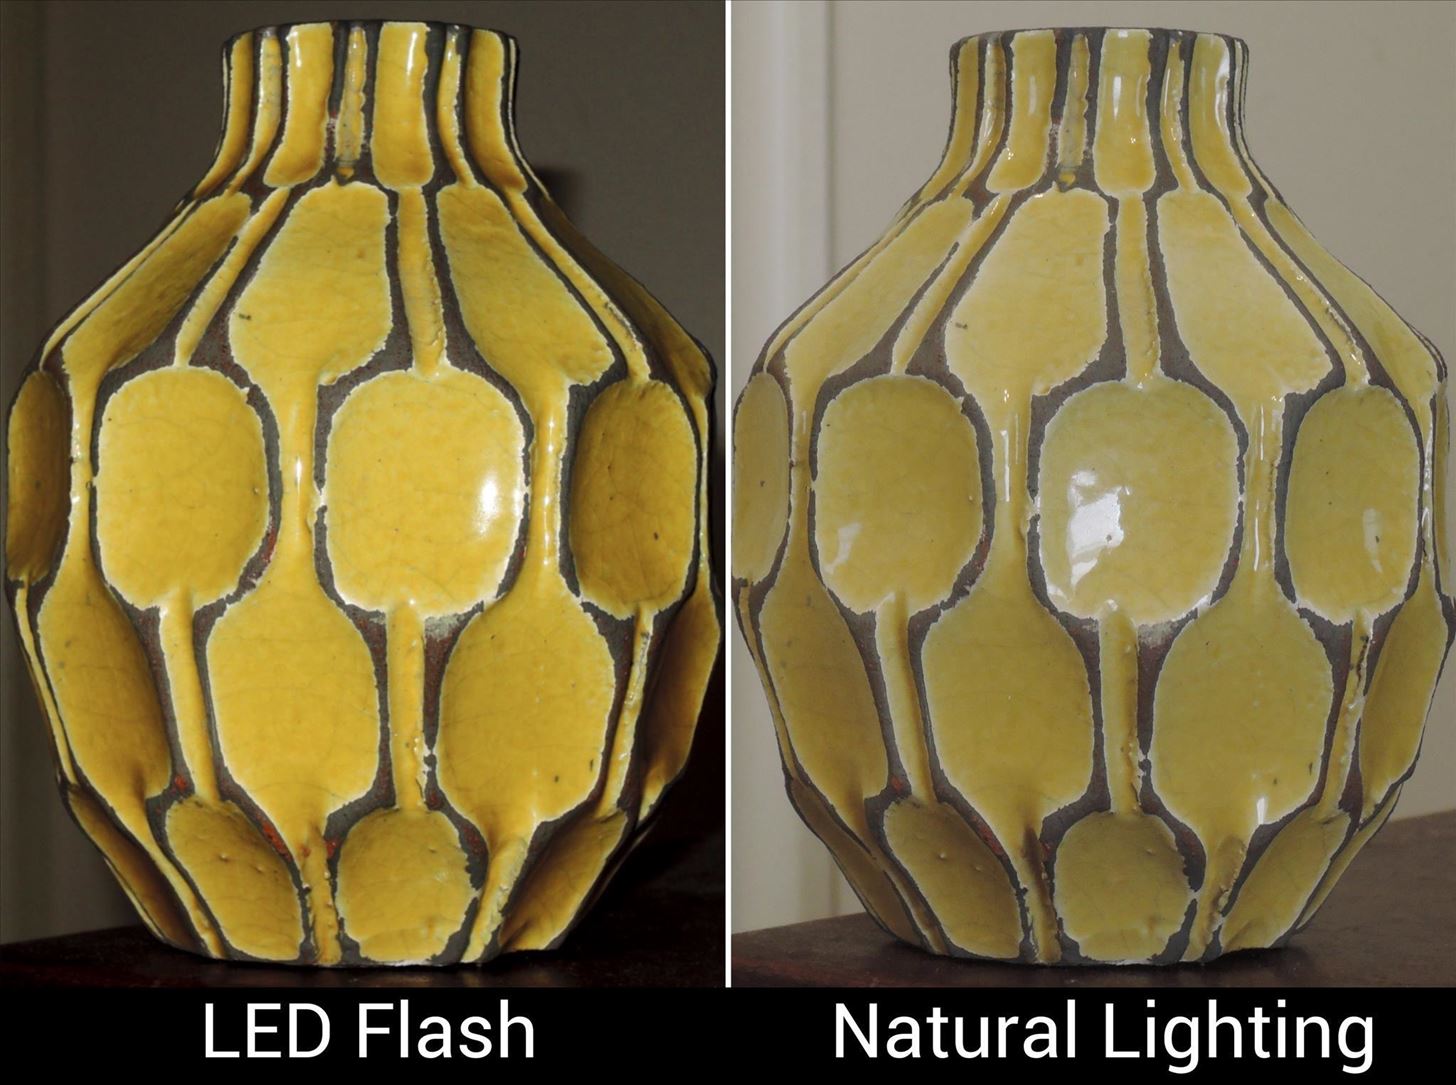
Tip #2: Avoid Using the LED Flash if PossibleI personally never use the LED flash on my phone, since my general rule is, "If the lighting isn't there, the shot isn't either." But I don't generally take pictures of myself or other people, so it's easy for me to get away with this.There are plenty of times where you might want to capture the moment, but you and your friends are hanging out at a dimly-lit bar. In these cases, using the LED flash is a necessity, but beyond that, it should be avoided like the plague. LED flash will generally put far too much light on the subject, resulting in an over-exposed foreground that lacks detail, with shadows cast on the background of your shot resulting in some portions being under-exposed. It's also a different color than natural lighting, so your subject will often come across over-saturated and in high contrast. On top of all that, no one likes being blinded, so only turn flash on when it's absolutely needed.
Tip #3: Obey the Rule of ThirdsChapter 1 in almost every photography book these days will center around once concept—the rule of thirds. Our natural tendency is to center the subject of our photos directly in the middle of the frame, but this generally isn't the most aesthetically pleasing way to frame things up.Don't Miss: 10 Composition Tips for Taking a Good Photograph Imagine your camera's viewfinder (your smartphone's screen) divided up into 9 equal parts, with two equally-spaced horizontal lines and two equally-spaced vertical lines splitting them up. With that in mind, try to center the subject of your shot on the intersection of two of these lines, and do your best to keep the horizon centered directly on one of the horizontal lines. El Capitan centered on intersection of two lines; horizon centered on bottom third. Some smartphone camera apps will have a rule of thirds overlay that places lines like in the above image directly on top of your viewfinder. If you're having trouble visualizing the rule of thirds, it might be best to enable this feature until you get a better sense of it all.
Tip #4: Know When to Use HDR ModeMost smartphone camera apps these days include an HDR mode, and while some do it strictly through post-processing and others do it by capturing multiple images, the end result is almost always about the same.HDR mode tries to imitate the human eye by balancing out the exposure in a shot, to the point where brighter areas aren't too bright and darker areas aren't too dark. The majority of modern phones do this by capturing a burst of three quick images at different exposure levels, then combining them into a single, well-balanced photo using software. (Some phones, like the iPhone, will even save a regular version of the picture in case you like that version better.)Since HDR mode does such a good job of capturing images the way we see them with our own eyes, you might think that it would be best just to leave it on at all times. But, due to the fact that HDR takes three pictures of everything, it's generally a bad idea to use it in any shot where the subject is moving, since it can result in some significant blur. Foreground exposure similar in both shots, but background over-exposed without HDR. As a rule of thumb, use HDR mode when the shot you're taking has both areas that are dark and areas that are dim—for instance an indoor picture with an open window somewhere in the frame, or an outdoor picture with a bright blue sky in the background. But when the subject of your photo is moving or if you have trouble holding the camera still, it would be best to leave HDR mode turned off.
Tip #5: Take Multiple Shots & Keep the Best OneNow that you've got the basics down, this last tip might actually push you into the category of professional smartphone photographer. Considering that smartphones have seemingly endless storage space for photos, and there's no longer a need to worry about wasting film, don't hesitate to take way too many pictures of the same subject.Try changing angles ever-so-slightly, bending down to one knee, switching HDR mode on and off, and capturing as many different images of the same subject as possible. When you're done, just open your gallery app and flip through the series to find the best photo, then delete all the rest. No one will ever know about the botched deleted photos, so you'll come across like a pro with your pre-selected final product. Have you used any of these tips in your smartphone photography just yet? If so, share your photos with us in the comment section below, or drop us a line on Facebook, Google+, or Twitter.
More Picture-Taking Tips:10 Photography Tips for Mastering Your Camera Phone Use a Drop of Water to Take Extreme Closeups with Your Smartphone An Extensive Guide to Creating Bokeh Photography Turn Your Smartphone into a 175X Digital Microscope for Macro Photos 5 Simple Ways to Add a Macro Lens to Your Smartphone
Apple's Ditching the 'Do Not Track' Option for Safari in iOS 12.2 «iOS & iPhone :: Gadget Hacks. النصائح والحيل 5 Views
20+ Features Coming to Safari in iOS 13 You Won't Want to
That's why you should change passwords regularly -- a potentially daunting task unless your password manager can perform it automatically. Find out if you're compromised following the
Find out if you've been hacked - CBS News
How to Overclock a lighter « Hacks, Mods & Circuitry
Chrome: Notes for Gmail is a Chrome extension that lets you add a note to a message as a reminder for the next time you look at it, or add a digest of everything important from a whole email thread.
Notes For GMail: Sticky Notes In Your Email Threads [Chrome]
With AKG-tuned earbuds, Dolby Atmos surround sound, and a cool set of stereo speakers, the Samsung Galaxy S9/S9+ is every bit a music enthusiasts' phone. However, when it comes to the audio
In this video I'm trying to change LED in a computer mouse for different color. The cheap mouse doesn't work well on shiny surfaces with the original red LED, but it works much better with white
Change Your Mouse LED Color!: 5 Steps - instructables.com
Improve Bluetooth Audio on Your Galaxy S9 with Custom Codecs. Previously in Android Nougat and lower, users had no option to choose which codec was used in cases where multiple were available on your audio device. For audio enthusiasts, this new flexibility is a big improvement. The Galaxy S9 offers SBC, AAC, aptX, Samsung HD, and LDAC codecs.
Use Samsung's Hidden Hearing Test to Get - Samsung Galaxy S7
Follow the instructions that came with the device to put it in discovery mode. On iPod touch, go to Settings , then tap Bluetooth. Tap the device in the Devices list to connect. iPod touch must be within about 33 feet (10 meters) of the Bluetooth device.
How to Connect Bluetooth Device to iPhone, iPad, or iPod
Get today's best tech deals HERE:
News: Forget Paris Hilton, All Hail Ducreux the OG King of the Selfie How To: Dance the twerk your booty dance News: This "Weight-Loss" App Lets You Shed 15 Pounds for Selfies Snapchat 101: How to Use Your Selfies to Create a Bitmoji Deluxe
This Mom Took 365 Days of Selfies to Document Her Weight Loss
The stock weather widget preloaded on your Samsung Galaxy S4 is really great, but there's one thing that's missing—options. The weather widget shows just the right amount of information at a glance, and it's not too shabby looking either, but for us softModders, it'd be really nice to have more options.
How to Make the Stock Weather Widget Transparent on Galaxy S4
Hey guys, I was wondering how to get rid of the carrier name on my Galaxy s3 on the lock screen. I've seen other Galaxies without the name on the lock screen, just the widgets,time, etc.
How to Get Back Lock Screen Customization in Android Lollipop
How To Hide Online Status On Facebook Chat From Unwanted Friends
0 comments:
Post a Comment