How To: Delete Emails in Bulk from Your iPhone's Mail App
Deleting emails can be a tedious process on the iPhone, especially since the "Trash All" options have been removed ever since iOS 10 first came out. Though likely well-intentioned, this change places an undue burden on all of us iPhone owners who now have to erase emails individually.Erasing them individually can equate to a significant amount of wasted time — just check out the video below if you don't believe me, which applies to iOS 10, iOS 11, and iOS 12. Thankfully, there's a little-known bug that you can still use to delete all unwanted emails in one go.This simple trick will work in any one of your email folders, whether they're flagged or unread. So if you're interested in deleting junk email en masse, I'll show you how to take advantage of this nifty bug now, because it could go away with the arrival of future iOS updates (though, it's already lasted three major iOS updates so far).
Don't Miss: The 5 Best Free Email Clients for iOS
Step 1: Filter Your MailFor starters, go to any folder you wish to purge of unread emails from the Mailboxes view. It could be a default folder for each account like "Inbox" or "Archive" or a folder you made yourself.Once inside, if you want to get rid of everything in that folder, there's no need to filter it at all. Skip to Step 2 if that's your case. Otherwise, if you want to be more selective, tap on the three-line filter icon in the lower left, where you can weed out your inbox by selecting either "Unread" or "Flagged" from the Include section.If you want to grab everything, you could also select "To: Me" and "Cc: Me" under Addresses. Any filter or combination of filters on the page will work. In my example, we'll just be deleting all unread emails from the folder.
Step 2: Save Any Wanted to EmailsThe next thing you'll want to do is check to see if there are any emails you want to keep, so scroll through the filtered view to make sure you won't be deleting something important. If you find anything you don't want to delete, there are multiple things you can do.
Option 1: Move to Another FolderSelect the email, tap the folder button at the bottom, then move it to a different mailbox. However, that will unintentionally mark the next email as read since it will automatically show it, so you'd have to mark it as unread before continuing. That's why it's better to use the alternative way, which also lets you save multiple emails at once: Tap "Edit" in the top right of the folder view, select all the emails you want to keep, then tap "Move" and select the appropriate folder.
Option 2: Mark as ReadSwipe left on the email to reveal the extra options (•••) button, tap it, then mark it as read. If you have multiple emails you want to mark read, tap "Edit" in the top right of the folder view instead, select all the emails you want to save, then tap "Mark" and "Mark as Read." Then, since they don't disappear from the filtered list like they do when moving to another folder, you'll need to tap the filter button in the bottom left to exit the filter, then tap it again to go back into the filtered view.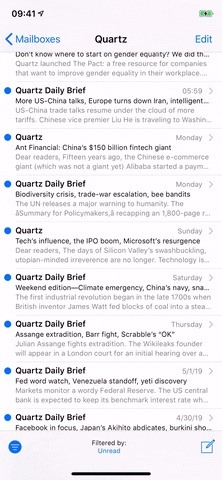
Step 3: Perform a Bulk DeleteOnce you're sure that only unwanted emails are left, it's time to proceed, so go ahead and tap on "Edit" in the upper right. Once in edit mode, select just one email by tapping the circle to the left of it.Don't Miss: Hide @iCloud, @Me & Custom Aliases from Mail's 'From' Field Now comes the magical part. Tap-and-hold the "Move" button at the bottom, but don't let go just yet. Next, tap to deselect the email you highlighted, then you can release your finger from the "Move" button. This will cause all emails in the filtered view to be selected at once, so tap "Trash" on the next screen to delete them all. You can tap the filter button again the folder view to see what's left. If you're worried that you might have deleted an important email, you can still go to your trash bin and give it one final look before the emails are permanently deleted. Once you're confident that nothing significant is in there, tap on "Edit," then "Delete All" to purge your email app of any trashed mail. You could also wait until they auto-delete, if enabled, which could be after one day, one week, or one month.Don't Miss: Use Siri with a Third-Party Email Client Instead of Apple Mail on Your iPhoneFollow Gadget Hacks on Pinterest, Reddit, Twitter, YouTube, and Flipboard Sign up for Gadget Hacks' daily newsletter or weekly Android and iOS updates Follow WonderHowTo on Facebook, Twitter, Pinterest, and Flipboard
Cover photo by Dallas Thomas/Gadget Hacks; Screenshots and GIFs by Justin Meyers/Gadget Hacks
Automator takes the work out of common repetitive tasks in Mac OS X. One of my least favorites is resizing images for the web, so I created a drag and drop action to quickly do it for me.
Quickly Encode a Video for the Web with This Drag & Drop
The following apps are three of the best for adding gesture navigation to your Android phone. The apps are all either paid apps or ones that seem worth the small cost to upgrade to the pro versions. 1. Navigation Gestures by XDA. When you open the Navigation Gestures app you'll go through a series of screens to set up the program.
News: This Hack Turns Your iPad into a Multi-Window Multitasking Powerhouse for $10 How To: Run Two Apps Side by Side on Your iPad in iOS 9 How To: Use Split View Mode on Any iPad Model How To: Watch YouTube Videos While Browsing in Chrome
How To: Hide All of the Stock Apple Apps on Your iPhone Without Jailbreaking How To: The Absolute Easiest Way to Hide Any App on Your iPhone News: It Looks Like iOS 10 Will Finally Let You Remove Apple's Crappy Stock Apps How To: Reset Your iPhone's Home Screen Layout
How To Hide ANY App On Your iPhone (Hide Messages, Snapchat
Any temporary file types with checkmarks next to them will be deleted when you erase the data. The temporary file types are as follows: Browsing History - The list of pages you've visited in the Chrome app. Cookies, Site Data - Saved pieces of data that help load your frequently visited sites faster.
Erase temporary files | Clean up with an expert tool
AD
Opera Mini is a lightweight and safe browser that lets you surf the Internet faster, even with poor Wi-Fi connection, without wasting your data plan. It blocks annoying ads and lets you easily download videos from social media, all while providing you personalized news.
Opera with free VPN - Apps on Google Play
How To: Enable a Translucent Navigation Bar in All Apps & Screens on Android How To: Get Full-Screen "Immersive Mode" on Android Without Rooting How To: Add Color to Your Nexus 7's Navigation Bar How To: Unlock Nougat's Hidden Nav Bar Tuner to Customize Your Nexus' Buttons
Working with transparency to create immersive Android experiences
According to Google, customizable swipe actions are rolling out to all users starting today. It is not yet live on devices that we checked, and its unclear whether this will be a server-side
3 Tips to Get to Inbox Zero Faster in Gmail « Android
How To: Download Any Video On Google Chrome! What's up, in this video I am going to be showing you how to download any video on Google Chrome using an extension. This extension doesn't work for
Download Video on Chrome with These 5 Free Online Video
News: 5 Secret Snapchat Lenses That Will Make Your Weekend — Infinity War, the Chainsmokers & More News: Try These 5 Hot New Snapchat Lenses — The Zucc, PUBG Helmet & More News: Snapchat Summons Dragons from Westeros to New York for Game of Thrones AR Promo News: World of Warcraft Lens on Snapchat Lets You Transform into Orc or Elf & Do
5 Snapchat Lenses You Have to Try Out This Week — Post Malone
As a rule, cookies makes your web browsing experience better and easier. But sometimes you may need to clear/delete cookies in your web browser for privacy or safety issues. For example, you used a public computer or someone else computer and now you want to delete all cookies to remove your information and preferences.
How to Clear Windows® XP Cache - YouTube
How To Copy And Paste On An iPhone. Before you can copy anything on an iPhone, first you need to select it. In other words, you need to tell your iPhone, "This is the text I want to copy." Some people say highlighting text instead of selecting, but since select is the "proper" term, that's what we'll use in this article.
4 Ways to Copy and Paste on Your iPhone or iPad - wikiHow
How To Scrub GPS Data From Your Photos; Or, How To Be Smarter Than Vice known as EXIF data, in images. This video tutorial shows how to set the same functions for an Android phone.
How to View (and Edit) Photo EXIF Data on Android
Share Uber wants to track your location even and even when the app is in the background of a customer's smartphone. it seems like Android users are getting fewer options than iPhone
Uber can now constantly track your location. Here's how to
Make sure that you have the latest version of iTunes on your Mac or PC. Then connect your iPhone or iPad to your computer with the USB cable that came with your device. If you see an alert that says tap "Trust This Computer?" tap Trust. Learn more about connecting a device to your iPhone or iPad's Personal Hotspot.
0 comments:
Post a Comment