How To: Root Android LThe Easy Way
While the preview images for Android's upcoming "L" release just came out yesterday, the new firmware has already been rooted, as is standard with its openness. So if you were feeling reluctant to try Android L because it didn't support existing root methods, then you might want to reconsider.One thing you should know up front is that, while root works perfectly on Android L, some root apps (like Titanium Backup) have not been updated to support the new SELinux kernel module in the new version of Android, while others (like Xposed Installer) do not yet function on L's new runtime, ART.After a brief hiatus, developer Chainfire has burst back onto the scene and updated his SuperSU ZIP to get root working on Android L. As a result, we can now enjoy root privileges on our Android L devices. Please enable JavaScript to watch this video.
This method will work on both the Nexus 5 and the 2103 Wi-Fi Nexus 7.
What You'll NeedNexus device with Android L (check out our install instructions using either Windows or Fastboot for help) Windows PC (sorry, Mac users)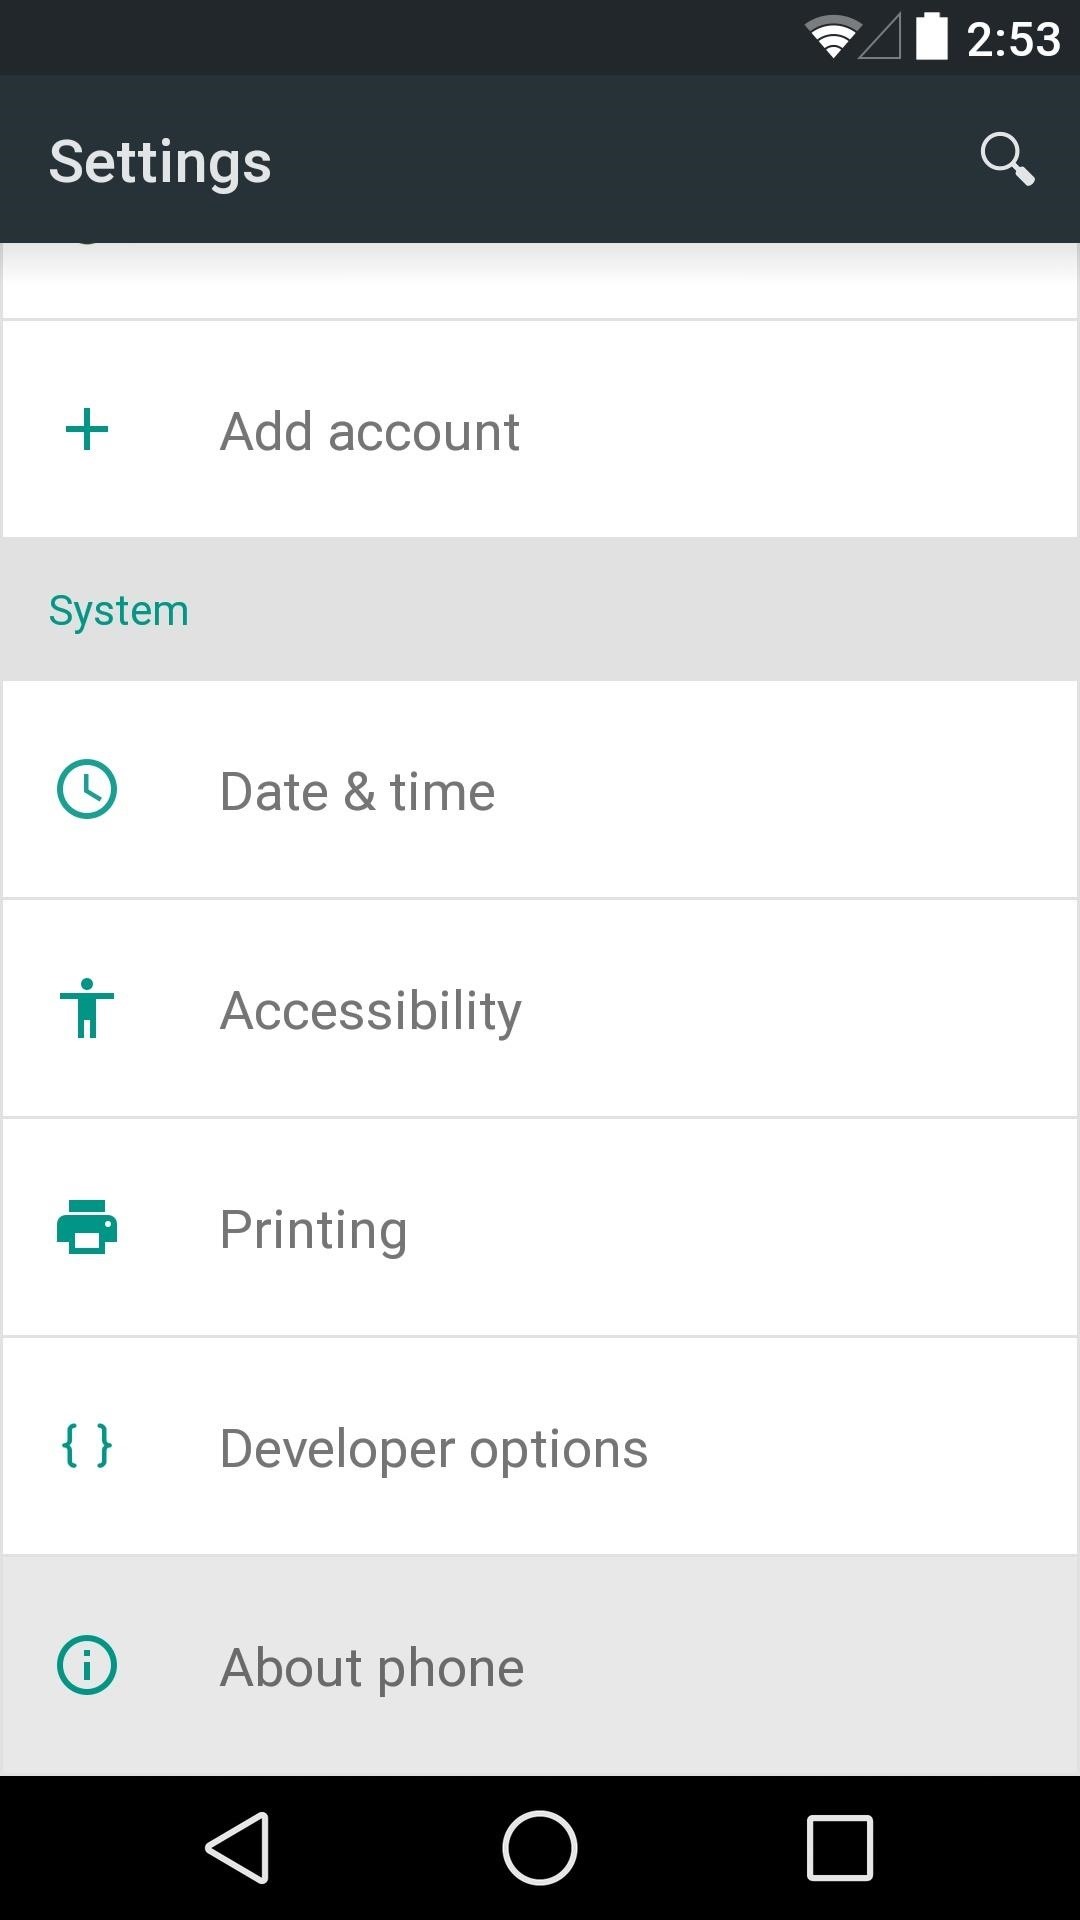
Step 1: Enable USB DebuggingYou already did this once when you installed Android L, but the process of installing the preview images wiped all existing settings on your device, so you'll have to do it again.Start by heading to Settings, then scroll all the way to the bottom and tap About Phone. In here, scroll down to the bottom again and tap Build Number 7 times. You'll see a toast message that says You are now a developer. Now, back out one level and you'll see a new entry for Developer Options. Head in here and tick the box next to USB Debugging, then press OK. At this point, go ahead and connect your phone to your PC using a USB cable that is in good condition.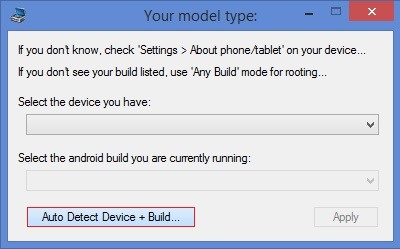
Step 2: Install Nexus Root Toolkit on the PCIf you used my Windows method and the Wugfresh Nexus Root Toolkit to get Android L on your device, you should already have all the necessary software installed.If not, just head to this link from your Windows PC and download the installer file. Run the installer file and allow Nexus Root Toolkit to download any files that it needs.NRT will ask you to enter your device name and build number, but since Android L is not in the toolkit's library yet, just hit Auto Detect Device + Build. At this point, you should see a message telling you to enable USB debugging on your phone. We've already covered that in Step 1, but now you should see a message on your phone asking you to allow your computer to connect. Tick the box next to Always Allow From This Computer and press OK. After this, you should be taken into NRT's main screen. From here, click Full Driver Installation - Automatic + Manual to install the necessary device drivers. If you've already done this as part of installing Android L in the first place, you can skip directly to Step 3. On the next screen, click the Step 3 tab and see what it says for Recommended Solution. Click the corresponding driver solution below that and follow the prompts for installation.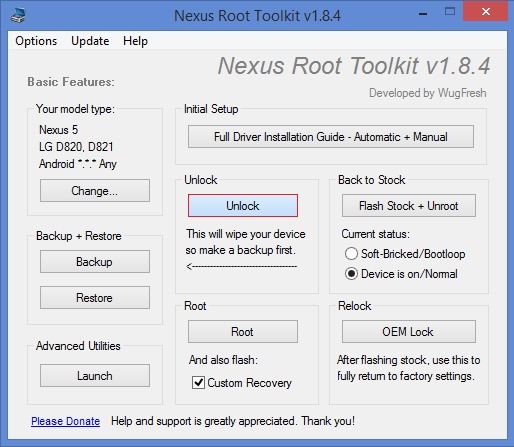
Step 3: Unlock Your BootloaderIn order to flash the SuperSU ZIP that will root Android L, you'll need to have a custom recovery installed on your device. But in order to install a custom recovery, you'll first need to make sure your bootloader is unlocked.Be aware that what little data you've accumulated on Android L will be lost when you do this, as will any apps you have installed, though those will restore once you've re-entered your Google credentials.From Nexus Root Toolkit, simply click Unlock to begin. Follow the prompts, and your bootloader should be unlocked within 5 minutes.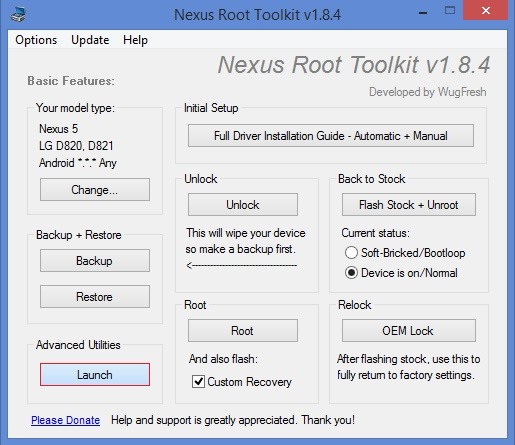
Step 4: Install a Custom RecoveryFrom NRT's main screen, click the Launch button in the lower left-hand corner. At the top of the middle column on the next screen, make sure Flash (Permanent) is selected, then click Recovery. Click OK on the following window, then you'll be asked to select the recovery you'd like to install. I'd recommend TWRP Recovery, as it has the best interface out of the options provided. Follow the prompts for installation, and when finished, you can exit out of NRT and disconnect your phone from your computer.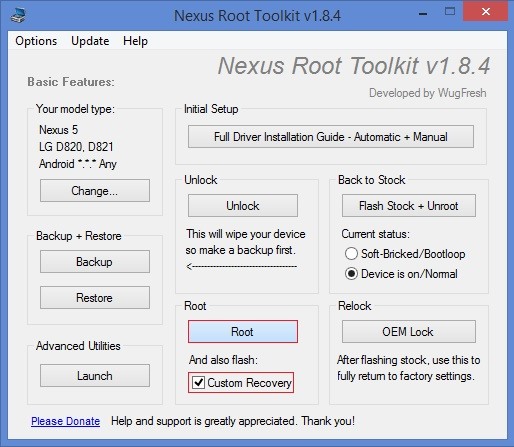
Alternate MethodIf you experience any difficulties with recovery installation using the method above (e.g., recovery not starting properly), there is a second method that you can use instead.Under the Root section of NRT's main screen, tick the box next to And also flash: Custom Recovery. Next, click the Root button. From here, just follow the prompts for installation until you arrive at this screen: Rather than installing the outdated SuperSU that the Toolkit is prompting you to flash, simply reboot your phone when you arrive at this step. From your Nexus, tap the Reboot button, then on the next screen, choose System. When your Nexus finishes booting back up, click OK on the dialog in NRT. You can exit Nexus Root Toolkit and proceed to Step 5 when you arrive at this screen: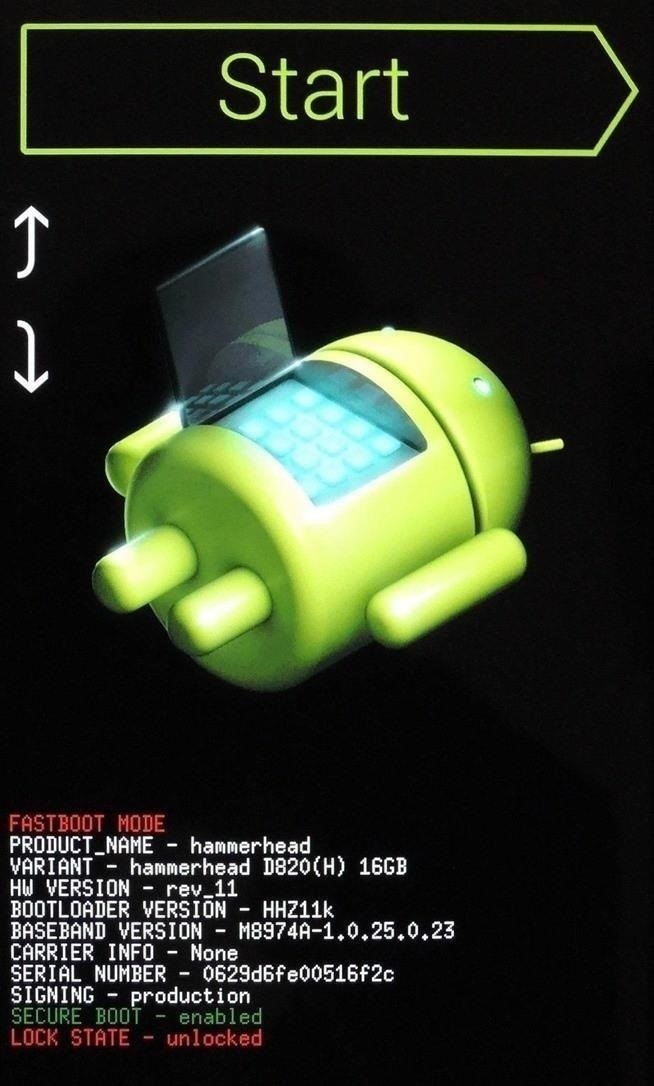
Step 5: Install the Modified SuperSU ZIPThe SuperSU ZIP that works with Android L can be found at this link, so just tap that to start the download on your Nexus.When the download is finished, you'll need to boot into recovery to flash it. Start by powering your phone completely off, then press and hold the Volume Down button. Next, press the Power button for a second or two, and you should be taken to Android's Bootloader menu.From here, press the Volume Down button twice to highlight Recovery Mode, then press the Power button to confirm your choice. This will take you into your newly-installed custom recovery. If you went with TWRP, just tap Install, then navigate to your Download folder and tap the Update-SuperSU ZIP file. Swipe the slider at the bottom to install, then hit Reboot System. When you get back up, you'll be rooted. Keep in mind that some root apps have yet to be updated to accommodate the recent ART and SELinux changes, but most work fine.What are some root apps that you couldn't live without? Do they work with Android L already? Let us know in the comments section below.
News: Always-Updated List of Phones With No Headphone Jack Built-In News: Leaked Videos Show Off the HTC One M9 2019 Gift Guide: Must-Have Phone Accessories for Audiophiles How To: Get Sprint's Exclusive Harman Kardon Audio on Any HTC One M8 News: These Pucks Turn All the Speakers You Already Have into a Badass Sound System
22 great phones with headphone jacks you can buy right now
In a previous how-to, I showed how to send and receive text messages by wirelessly syncing them from your phone to your Nexus 7 tablet. Some eagle-eyed users may have notice that the Nexus 7 with 3G actually has a SIM card slot.
How to hack a cell phone text messages from computer - gthq.org
So, are you ready to unlock the bootloader of your HTC One M9? If you are, before doing anything else, read all the lines from this tutorial. gaining root access, installing custom recovery
How To Unlock Bootloader On Any HTC Smartphone
(This opens up in the Inbox app, and the dialog to create a reminder is not as friendly as Google Now, especially if you want to add a custom time.) Supposedly Google Now will ask you if you would like to add a shortcut to the home screen after you use it to create a reminder, but I can't get it to ask me.
How to Add Reddit AMAs to Your Calendar & Get Reminders on
1. Using the Option key. This is the easiest way to capture a screenshot without drop shadows on a Mac. What you need to do is open the window that you want to be captured, press "Command + Shift + 4" and then Spacebar, hold down Option key on your keyboard and then click the window you want to capture.
How to take a screenshot without the shadow effect on Mac
We've talked before about EXIF data—or metadata—attached to photos and how it can expose information about your location, what type of device you're using, and even the device or camera's unique identification number. If you think it's not that big a deal, just ask John McAfee—his location was
What Is EXIF Data, and How Can I Remove It From My Photos?
How to Turn Your Nexus 7 Tablet into a Futuristic Heads-Up
Which Stores Accept Apple Pay? The Always Up-to-Date List
I've ranted quite enough recently about the price of phones to really need to touch on that here. But, for many people, the $150 savings is reason enough to purchase this over the S10 or the Plus.
List of Smartphones Coming With Snapdragon 835 Processor
Download and Install Facebook Lite on your iPhone: iPhone is known for its security and durability. When it comes to this feature iPhone takes care of various feature to save it from the various third-party application.
Download & install Facebook Lite on iPhone [iOS 9 & Above
How to Connect to the Internet On Your Laptop Through Your Cell Phone. This wikiHow teaches you how to use your iPhone's or Android's cellular data to connect to the Internet on a computer.
Setting up my mobile phone for internet - Samsung Galaxy S4
0 comments:
Post a Comment